Wednesday, April 14, 2010

Grandpas Shirts - Refashion # 3 - Another dress!

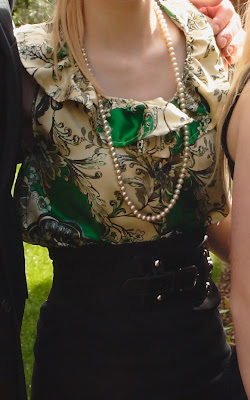
This dress is technically still in progress. I'm not too happy with how it is right now; it's a little shapeless (it looks better in the pictures than in real life, I think..). I'm thinking of maybe tightening the skirt a little bit - making it more pencil skirt-ish to give it some shape.


Basically, all I did with this dress is cut the top part of the shirt and the sleeves off so I had a long tube, just like with the blue dress. I sewed the sides up, made armhole shapes, and then pleated the top. You can't see it very well, but the neckline is 3 big pleats that are are also pleated at the waistline.

I ran some elastic through the waist , then created a 'sash' out of the leftover material.
I have super narrow shoulders, so this bar across the back became a necessity after adding the straps...
I liked the buttons in the back for this one!


Tuesday, April 13, 2010

Pintucked Cotton Shirt

I love love LOVE this shirt! It was made out of remnants of a shirt my grandpa had made for him (I never found the actual shirt though...weird). Luckily, my grandma always buys way more fabric than needed, so lots of remnants!

The fabric is absolutely beautiful - you might not be able to tell in the pictures, but the flowers are all rimmed with gold. I knew I had to make something that I would wear a lot with it, because the fabric is just too pretty to waste!


I started out just cutting two squares out with the selvage edge (yay no hemming) at the bottom. I sewed them together making a tube big enough to fit around my hips with some room to spare. Then, I made a little yoke - that was the tough part, since I didn't really use a pattern and just made it up. I used some plain black fabric for the 'strap' part in front, and made the 'straps' in the back out of of the same fabric. Quite frankly, I did this because I was running out of material!

Then came the fun - pin tucks! I was going to use this as a tutorial for pin tucks, but once again no camera. I'll be making a shirt with tucks soon though, so look for a tutorial on them coming up! I did tucks along the front of the shirt to help shape it.


The black straps in front were looking a little plain to me, so I added rows of stitching to give it some texture. I like the effect!


I then made a lining for the top yoke part, and attached it to the main shirt piece. At this point I had a shirt with a yoke that didn't actually connect at the shoulders - I kept the two straps seperate. I wasn't sure what I would do next, but I knew I wanted to do something cool. I was cleaning out some crafting drawers at the same time as making this, and remembered something I saw earlier... black bias tape remnants! Aha!

So, the two straps are connected with three bias tape strips each. I really like that detail, and was pretty impressed with myself on that one! :)
Unbelted, the shirt has a swing, trapezy look to it. For the pictures (and for most of the time I wear it), it's belted with a stretched out braided headband I scored at forever 21 for a buck.


Ta da!


Monday, April 12, 2010

Grandpas Shirts - Refashion # 2 - dress!


My grandparents own a timeshare in Hawaii, and every couple years we go with them. My grandpa had numerous 'tropical' shirts that he'd wear to Hawaii, so I'm going to be making shirts and dresses out of those to bring this year as a tribute to him.


This is by far my favorite refashion so far. I kind of made it up as I went along, and if I could do it over again there are somethings I would do differently! But overall I like it a lot. The color is bold and beautiful, and I just lOVE the big graphic chrysanthemum type flowers on it!


I started taking pictures as I went with this, but then my camera died and I lost my charger. So no pictures along the way :(. I'll try to describe what I did though!

First, I removed the sleeves and the very top of the shirt (mainly the collar), so I had a tube with some armholes cut in it. I straighted the edges out (trimming where the armholes end, if that makes sense) so I had two trapezoidal shapes. I used these for the skirt.

Then, I cut the bodice part out of the sleeves. This is where I really wish I had my pictures, as it's hard to explain! Basically though, the shape I cut out was about the same as what it looks like, only a little bigger. I gathered down the middle of the bodice, and then here's my favorite part - BUILT IN BRA! I always save old crappy bras for projects like this. I cut the bra apart so I just had two attached cups, then hand-sewed it into the front of my bodice. I then sewed a cotton lining over the top of it. Next, I smocked the whole darn thing from the bra all the way around the back, and even a couple rows on the very top of the bra (which give it that ruffled look).


I attached the top to the skirt and did some more smocking around the bottom of the bodice because it was a little too maternity-ish for my taste.


Finally, I added two straps of just plain white elastic. And they tuck down easily if I want to go strapless. I know this is a pretty crappy tutorial - let me know if you have any questions or comments :)


Sunday, April 11, 2010

Tropical Sweetheart Dress - in progress


As you probably already know, I don't often use patterns. I usually prefer to draft my own (without much success) or to just start cutting and cross my fingers (also not so successful). However, sometimes even I am realistic and realize that without a pattern my idea probably won't work.

So, I am using a pattern for the first time in a while, and hoping it works! I love the style of it, so if it works out I will definitely use it again. For this one I'm doing it without the sleeves, as it's kind of a tropical print. Here it is: McCalls 5971


I also wanted to post a picture of the cotton fabric I got for it - it's a lovely tropical watercolor kind of pattern, with big turquoise and fuchsia flowers on a white background. I couldn't find it on the Joann's website though, so you'll have to wait to see it :)

Grandpas Shirts - Refashion #1 continued

So, I FINALLY have some pictures to put up of some refashions I've done! I have several completed ones that I'll be posting when I have time, so keep checking back.

Here's a couple more pictures of the last one I posted forever ago, belted with jeans version!


Friday, March 5, 2010

Grandpas Shirts - Refashion # 1 !

So, I did this refashion super fast the night before my grandfather's funeral, because I wanted to wear it to the service! Therefore, I don't have any in progress pictures, but I pretty much followed my button up ruffle shirttutorial for it. I didn't add the smocking around the waist however, and I didn't shorten it - didn't have time to hem! I also wound up with the neckline a little too wide, so I added some pleats in the back along the shoulders to take it in a little. So I wound up with a very blousy, long, tunic-like shirt. I wore it with a pencil skirt for the service:


I also love wearing it with skinny jeans, boots, and a wide black belt - it's really comfortable and chic! I don't have any pictures of it like that yet, but I'll put some up.

Thursday, March 4, 2010

By the way, I have three kidneys...

and they frequently make me sick. Thanks to kidney infection #5, my meal plans got a little screwed up in the last few weeks. HOWEVER, I do have some awesome men's dress shirts refashions coming up!

My grandfather passed away last week, and I inherited a wealth of his old shirts. He was probably one of the very few men in the world who could pull off anything from pastel lavendar suit jackets to brazen, colorful mickey mouse ties to brightly colored floral shirts with glitter running through them -- all while looking very intimidating. I have remade his shirts before, so I know they are very suitable for this. And what better way to pay tribute and remember someone so flamboyant than to wear his beautiful clothes (in a new form, of course)?


I already have one shirt finished and more in progress, so keep checking back for pictures and possibly tutorials, if I find the time :)

Tuesday, February 23, 2010

Ricotta Day 2: Ricotta-Tomato Toasts


Description:

These kind of remind me of high class pizzas - tomato and ricotta on crunchy french or italian bread.

Ingredients:
  • - 4 slices crusty bread (or more depending on the size; we used little ones)
  • - 1/2 cup part-skim ricotta cheese
  • - 1/4 cup tomato slices
  • - olive oil
  • - Salt and freshly ground black pepper to taste

Directions:


1. Lightly toast bread.

2. Spread each toast slice with 2 tablespoons ricotta.

3. Put tomato over the ricotta. Drizzle the toasts with a small amount olive oil and sprinkle with salt and freshly ground black pepper.

4. Broil 1 to 2 minutes, or until cheese is bubbly.


What we thought:

From someone who doesn't care for tomatoes, these were yummy. And they were so cute! Not super filling though - better suited for appetizers or finger food.

I snapped a picture because I thought they were so cute!


Monday, February 22, 2010

Ricotta Day 1: Spinach and ricotta rigatoni

Description

Here's what the recipe I found said : "A quick take on spinach and ricotta cannelloni, this baked pasta is fast because there's nothing to stuff. The filling is simply tossed with cooked rigatoni that's then topped with fontina and baked to a golden brown. "


Ingredients

  • 1 pound(s) rigatoni
  • 3 tablespoon(s) olive oil
  • 1 package(s) (10-ounce) frozen spinach, thawed
  • 2 cup(s) (about 1 pound) ricotta
  • 5 tablespoon(s) grated Parmesan
  • 1/2 teaspoon(s) grated nutmeg
  • 3/4 teaspoon(s) salt
  • 1/4 teaspoon(s) fresh-ground black pepper

Directions
  1. Heat the oven to 450°F. Oil a 9-by-13-inch baking dish.
  2. In a large pot of boiling, salted water, cook the rigatoni until almost done, about 12 minutes. Drain. Put the pasta in the prepared baking dish and toss with 1 tablespoon of the oil.
  3. Meanwhile, squeeze as much of the water as possible from the spinach. Put the spinach in a food processor and puree with the ricotta, 3 tablespoons of the Parmesan, the nutmeg, salt, and pepper.
  4. Stir the spinach mixture into the pasta. Top with the remaining Parmesan. Drizzle the remaining 2 tablespoons oil over the top. Bake the pasta until the top is golden brown, 15 to 20 minute
What we thought:

Super yummy, super quick, and once again sneaking spinach in where you can't really taste it. Originally the recipe called for Fontina cheese as well, but I wouldn't really use it for anything else so I skipped it. Maybe it would've been better with it; even though it was very good some could potentially find it a little on the bland side. 4 stars!

Saturday, February 20, 2010

Week 2: Ricotta

Unfortunately, the last couple feta recipes were not so great. In fact, one was so horrible we threw it out without even eating it! This coming week though we'll be eating Ricotta. I love ricotta cheese more than just about anything, so I'm very excited!

Here's my grocery list:

Version:1.0 StartHTML:0000000167 EndHTML:0000000792 StartFragment:0000000457 EndFragment:0000000776

- rigatoni

- spinach

- ricotta (the big container!)

- spaghetti sauce

- asparagus

- crusty bread

- tomatoes

LinkWithin

Related Posts with Thumbnails