Showing posts with label tutorial. Show all posts

Wednesday, April 6, 2011

Ruffle Cardigan Tutorial


Have an old boring sweater sitting around that could use some sprucing up? Check this out for a super quick and easy update that will make your cardigan look super sweet and feminine!


Monday, April 4, 2011

Bow Shoulder Shirt - T shirt remake tutorial!


I love love LOVE this, and can't wait to make one! I especially like the stripes - they set the bows off perfectly.

To see how to take a cheap long sleeve t-shirt and turn it in to this, look here.

Saturday, December 18, 2010

12 Days of Christmas ~ Five and Six!

I got behind yesterday, so today will be a two-fer!


...so no one's wine glasses get mixed up!!

A set of these make great gifts! They're super easy to make, very customizable, and beautiful. If you are super creative, you can even combine them with the next tutorial as well...

Find out how to make these here.


This was a super tough one. Just like hens, what can you really do with geese? Ah... eggs! More specifically, golden eggs. So I guess it should really be 'On the sixth day of Christmas my true love gave to me, six geese a laying golden eggs.."


I made one of these necklaces for my mom for mother's day with birthstones of her kids in it. However, I think the idea of simply gold eggs is also beautiful. I'm not super fond of the nest in the above picture, but the tutorial I found for you (I was going to make one, but thought that maybe there'd be one out there - turns out there are tons!) makes beautiful, more realistic nests, like below:


These would also make amazing gifts - find out how to make them here.


Tuesday, December 14, 2010

12 Days of Christmas ~ Two Turtle Doves


...in the form of napkin rings!


What you need:

Note that you can get the birds and nest in the floral department at most craft stores - I got mine at Michael's. Sometimes you can even get the birds already in the nest!

- A napkin ring
- A small bird nest- small enough so it doesn't look funny on the napkin ring.
- Two any-color birds, preferably with brown wings
- A hot glue gun
- Bleach
- A couple Q-tips


Step 1: Glue your birds into the nest. I did this first; in retrospect it might have been smarter to do step two first!


Step 2: Now, obviously we don't want orange birds for our turtle doves. In fact, until I actually looked it up I thought they should be white! Then I saw this picture:


I was pretty happy, because I wasn't able to find solid white birds at the craft store and the only ones they had had brown wings made out of pinecone pieces, which would be hard to bleach or paint!


SO, dip your Q-tip into some bleach and dab it along the birds. You should see the color start to fade almost immediately. Keep dabbing and rubbing until all the color has faded (you might need to wait a couple minutes to see the complete results).

This is what they looked like partway through:

Step 4: Grab your napkin rings. I would personally use skinnier, more organic looking ones, but there were all we had in the drawer so I used them.


Now, hot glue the bottom of your bird nest to the napkin ring. Pull your fancy napkins through (once again, I would probably use a more organic cloth for this, but purple damask was all I had on hand!) and voila, two turtle doves and a holiday napkin holder.


Check back tomorrow for 3 French Hens - I'm really excited about this one!

Tuesday, October 26, 2010

Dying Elastic

Ever wish that it was easier to get ahold of elastic that wasn't boring white or black? I know I sure have!! So many things right now are made with the elastic showing (and don't even get me started on wide elastic belts, which are my favorite thing ever).

So what do you do when you want some beautifully bright hued elastic for your project? Be like Dana from Make and dye it!


How amazing would some dyed elastic look on the tank dress?

Sunday, October 24, 2010

Kid's Flower Pot Halloween Costume - Guest Tutorial!

Anyone with kids who don't have their halloween costumes yet, check this out!! This is such an adorable idea (sent to me by Jessica from Copycat Crafter) for a quick costume that looks great. Don't take your kids to the picked over halloween costume isle in walmart - make them a super cute costume like this!!

Hi there!
I am so honored to be invited to guest post here at Ruffles and Roses today! Normally all of my posts are about copying free tutorials online, but I decided to try my hand at writing my own for the first time. The idea is still copied from a site with ideas for unique costumes, but since there wasn't a tutorial, I got to write it up. It is so incredibly easy. The only "tool" you really need is a glue gun! I hope you'll take the time to try it or even just make up your own unique costume to share. I'm banking on my kids really appreciating the homemade costumes when they are adults and right now they are young enough to enjoy anything I make them. It's a great place to be! Thank you Amber for the opportunity to present this tutorial! Have a happy and safe Halloween everyone!

I LOVED this costume. In all honesty it will forever be "THE" costume. You know, the one that all others will be compared to. It's just so stinkin' cute. AND EASY. Are you sensing a theme to my posts? I only do easy things. I don't have time (or brain cells) for difficult. My kids have sucked away my time and brain cells and you know what? I'm totally ok with that. They are worth it. So here is a fun idea for a costume...


(Ok, so I'm a freak. It stresses me out to have my kids face all over the internet...as if there are millions looking at my little blog. But still. I'm a freak, so you have to look at a creepy pic of my kid with a blocked out face. It's how I roll. )

Want a tutorial FROM ME??? OK!

What you will need:
1. Green shirt and skirt (or leotard)
2. Green tights
3. Green shoes
4. Dollar store flowers
5. green ribbon
6. hot glue gun and glue sticks
7. Wooden bucket thing and saw
8. cheapo plastic headband

(Note: I glued the flowers on the front and back of the shirt plus a strip down the top of the sleeves.)

What to do:
1. Cut out the bottom of bucket with a saw
2. pop the flowers off the stems and hot glue them on the shirt and headband
3. tie ribbon on the bucket handles so they cross, to use them like suspenders
4. Put it on your kids and go door to door for some candy goodness!

(Note: I believe my husband just PUNCHED out the bottom because it was easier than sawing it out!)

Now because I'm a big fat copycat I must tell you...sigh...I did not make up this idea. I found it here...but there isn't a tutorial...sooooo I got to do one myself! Whoot! Now go make a unique costume for your kiddo!
PS...my son was the cutest bee you ever did see...we are theme halloweeners...snicker snicker ;)

Thursday, October 21, 2010

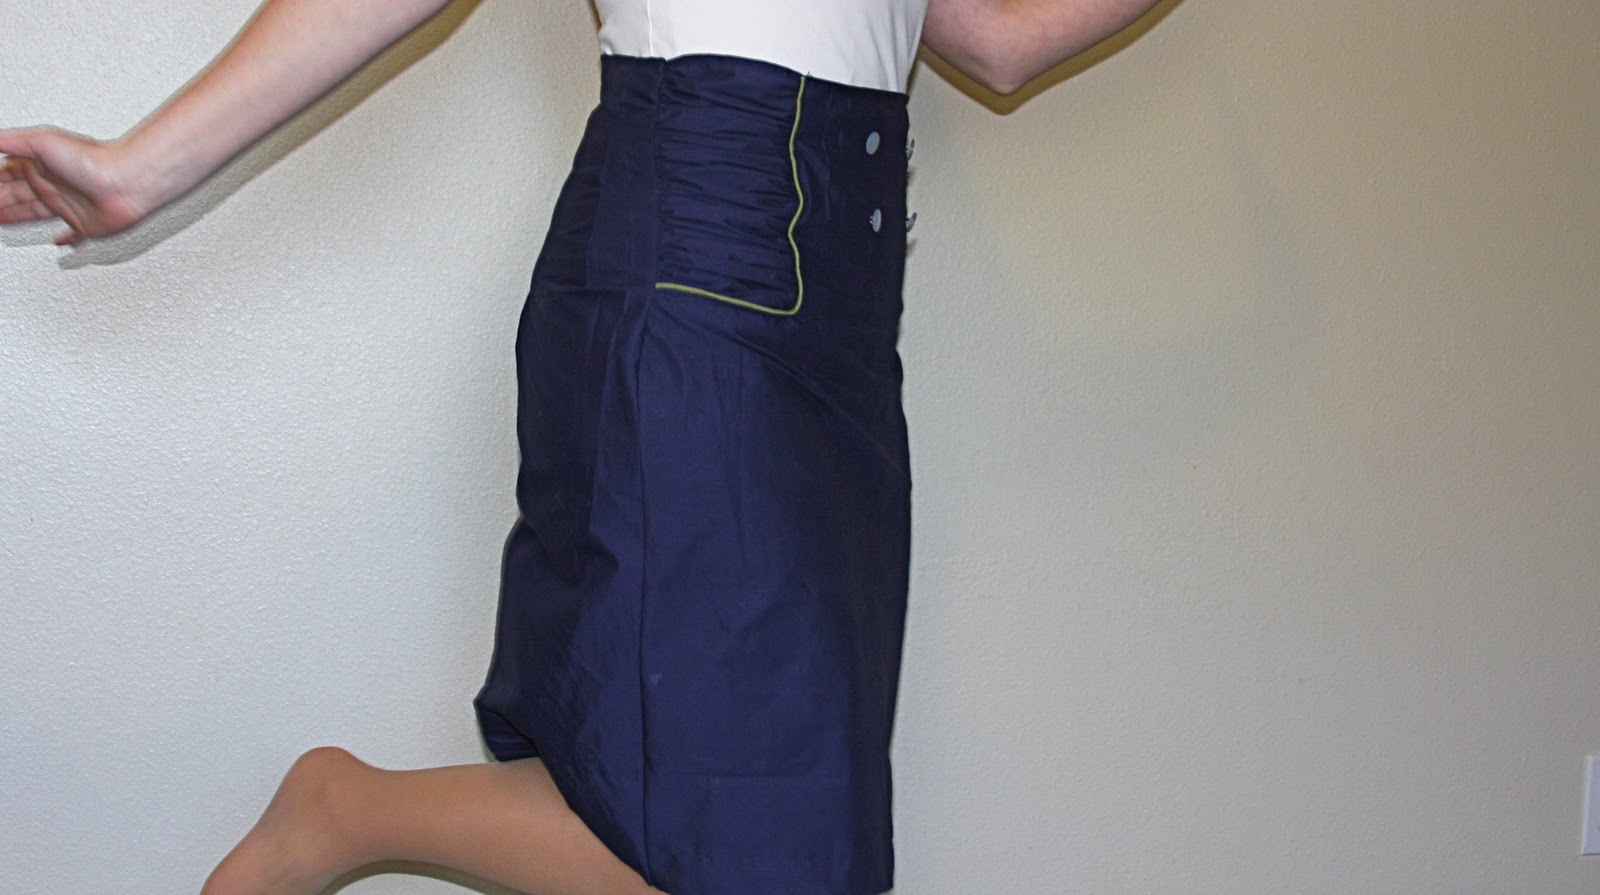
Military Pencil Skirt - guest tutorial!

Here is our second guest post! I asked Shauna if she could do a guest post for me after seeing some of her other projects - she and her sister do amazing stuff over at their blog! Check it out here! I am sooo in love with this tutorial - this skirt just got bumped to the top of my to do list.


Hi Ruffle and Roses readers! I was so honored to be invited to guest post here!


My name is Shauna and I am one of the Shwins behind Shwin & Shwin. My sister and I started the blog to share our ideas with each other and with anyone else who was interested and it has been a ton of fun. Today I am going to share an inspired by the runway look.


A few weeks back I made a skirt for my daughter inspired by this look from project runway. It was from the team challenge, from team millitary lace.


This is the skirt I made for my daughter tutorial found HERE


Today we are going to make a few adjustments and make one for a grown up.


So let's get started!


You will need:


  • Fabric

  • Piping

  • Buttons

  • Zipper


The pattern for this skirt is really easy. Here are the basic shapes. All straight lines so I cut it free hand. Then length of all the pieces is the same and that is the desired length you want the skirt (plus enough for hemming and finishing the top edge so add an inch or two) To get the width Measure around the widest part of your lower half for me it is around my hips and behind. Divide that in half this is the width of the front piece, then cut a back piece the same width plus 1 inch and cut that in half the long way so you have two rectangles (pictured on the right in the picture) With your front piece fold it in half and cut away the space for the side panels. How big you make them is up to you. I measured from where I would wear the skirt on my waist down just past my hip bone and that was how low I cut, as for width, I did about 5 inches. Again it's up to you and how you want it to look in the end. Then with the width of what you cut away (so for me 5 inches) cut two rectangles that width and the length of the skirt. Then you are done. Easy right?


On to sewing. First sew under the top edge. (you can do this now to all of your pieces, it will save you time later)


Then you are going to take your piping and pin it along the edge of your cut out. (on the right side of the fabric) Pin it piping facing in, and when you get to the corner as shown above you can put two little slits in the edge of the piping to help you round the corner. Once you pin it sew it in place following the stitching line that is already on the piping.


Then turn the piping so the flap is in the wrong side of the fabric and your piping should neatly outline the cutouts and top stitch in place.


This is what you should end up with. Do it for both sides of the cut out.


Then take your long narrow rectangle and with the basting stitch sew along both long sides of the piece.


Then pin your ruffled piece in side the cut out.


On the back now. First sew the zipper in place. (follow the instructions on the zipper you buy)


Then sew the two back pieces together below the zipper.


I thought I got a picture of this next step but I didn't sorry. Next you are just going to sew the right sides together along the side seams, sewing together the front and back pieces.


If you tried your skirt on at this point then you probably noticed it is a box that is a gapping mess all around your waist. If for some reason it it not and it fits your perfect then skip this next part. So to pleat the top of the skirt so that it fits your body this is what I do. Measure around your waist where you will wear the skirt. Subtract that measurement from the measurement of the skirt. This will tell you how many inches you have to take out of the skirt. Starting in the middle back I place one pleat on each side of the zipper, and then another pleat and so forth until your measurement becomes your waist measurement. To make these pleats, fold the fabric over so right sides are together and place a pin how narrow or wide you make the pleats depends on how much you are taking in. Then measure from your waist down to where your widest point is, this tells you how long your pleats should be. I pin the whole pleat and then Try the skirt on inside out o see if it is a good fit.


Then sew your pleats. The bottom of your pleat needs to taper off real gradually so your done have a weird pucker on the outside so make it a gradual slope (like pictured above)


When you are done pleating, you re done with your skirt. After this I added a few buttons to the front, but that is optional, do what you like.


Try it on


Jump around


And Enjoy!

Wednesday, October 13, 2010

Pioneer Reverie Headband Tutorial - Guest Post!

Here is our first guest tutorial!! I am super excited about it - I asked Sabrina a few days ago after seeing another one of her headband tutorials. She makes the cutest stuff, and this one was specially made just for us. Enjoy! :)


Hello, my name is Sabrina from Honor Roll and I am so excited to be guest posting for Ruffles and Roses today! Fall is my very favorite time of the year. Its colorful and cozy and invites all kinds of texture into your wardrobe. Pretty silky camisoles and skirts from summer can still be mixed in with the chunky knit sweaters, scarves and tights of winter. Leather, corduroy and wool replace raffia, cotton and linen. With this headband, I hoped to recreate that autumn feeling - a sturdy leather base softened by a flower of silk and chiffon. Would you like to make one too? Gather some supplies:


3 yards suede cord
scraps of silk/satin/chiffon/tulle (a combination of any of these)
8-12" 1/4-inch elastic cord
2 shank buttons
scissors
needle & thread
sewing machine
iron
hot glue gun (optional)

Instructions:

1. Cut the suede cord into 6 strips. They should each be 18 inches long. Tie a knot in the end of three strips, secure down with a pin and loosely braid the length of the cord. Again, tie a knot. Now repeat with the other strips.

2. The braids should reach to the back of your ears. Using the elastic to measure, cut a piece of elastic that wraps around the back of your head from ear to ear. Mine is 8 inches long.

3. Cut your scraps of fabric into various sized squares. Fold the square in half and cut to make a circular shape.

4. Layer the fabric circles on top of one another from largest to smallest. Position the button in the center or slightly off-center and sew through to secure. Loop the thread around at least 3 times to make sure the button won't come loose. Repeat to make 2 full and lovely flower blossoms.


5. Next cut two strips of fabric that are at least 3 inches longer than your elastic. Iron the long sides toward the center (starch helps a lot if you're using a silky fabric). These pieces will make up the elastic casing.
6. Sew the two strips together, facing one another, keeping the elastic piece in the middle. It should stretch to fit on your head and the casing with bunch up in the back when its not on. This did not turn out beautiful and thankfully it will be hidden by my hair. I didn't realize how slippery and difficult silky fabrics are too work with!!


7. Now we attach the leather braids to the elastic strap. If you have a leather needle, you can do this on your sewing machine, otherwise you will have to sew it by hand. Hot glue might work too if you have a steady hand. I kept the knots on the outside of the headband, so you can see them behind the ear.


8. Try on the headband to find the flower placement. Hot glue or hand sew one flower to each braid strap. If you sew together the petal edges that touch, this will help keep everything in place when you're wearing it.


9. Voila! You are finished. Wear and enjoy!


LinkWithin

Related Posts with Thumbnails