Showing posts with label Christmas. Show all posts

Saturday, December 17, 2011

Christmas Ornament + Star - Tutorial


Love this so much. This would work on a full size christmas tree in addition to other ornaments, or a small stand alone tree... To see how to make the ornaments AND the star, click here.

Saturday, December 10, 2011

Candy Cane Garland


I know I said I'm not a fan of felt, but this has actually been hanging out in my "I should do this..." project queue for a while. It would be really cute draped on a tree, around garland, or pretty much anywhere! Also, it looks REALLY easy... check it out here.


Speaking of trees... when I was a baby, I LOVED pulling ornaments off the tree. I'd imagine that's a situation a lot of new parents face. You can't really just have a naked tree, but at the same time you don't want broken ornaments and broken babies. My parents solved this problem by making a bunch of red bows and putting those on tree instead (and we still put some on their tree every year). I think that this is a great addition to that - a pretty felt garland with some bows. It'd make a really festive tree without anything fragile (also really, really low maintance... decorating and undecorating would take two minutes!).

Friday, December 9, 2011

Christmas Tree Tutorials - A complete set!

Yesterday I posted the felt ruffle tree tutorial by Mel over at Bliss Bloom. What I failed to notice was that she had tutorials for all of her beautiful trees. I can't wait to make the pearl one! Head over to her blog to find out how to make your own beautiful christmas tree collection.

Thursday, December 8, 2011

Christmas Tree Tutorials - Felt!

I think felt always gets a bad rap in my mind. It reminds me of tacky kid crafts and tacky do it your self projects and ...well, tacky. However, I found some felt trees that definitely make the non-tacky felt argument!

By the way.. can you tell I love Christmas trees? Don't worry... I have some other Christmas things to post too.

I love these felt glitter trees from Lorajean, but even more I love her whole mantle!! How amazingly beautiful is that? But back to the trees - these look pretty quick, easy, and beautiful. I actually made some trees similar to this but used rose petals instead of felt - I'll be posting a tutorial of that soon!


This is a really awesome and unique idea... I almost made some of these, but honestly I HATE cutting out circles. Which is unfortunate, because there have been a lot of really cool circle-felt tutorials lately.


I really love the pointy texture to this one - I think it might look cute next to some of the more rounded ones for a little variety on a mantle. You could do this in any color too.. I really like the idea of doing a gradient in the color. Never would have thought of that!


And last but not least - the ruffle felt tree! I've seen these in previous yars and always liked them.. they're so cute and fluffy! As a bonus, looking at this tutorial will also teach you how to make a ruffly wreath.

Thursday, December 1, 2011

Christmas Tree Tutorials - Ruffles!


Most fabric-based tutorials seem to be based on ruffles... what a perfect idea! Ruffle trees are quick, easy, and can be made with scraps you have lying around. Also, they're ruffles... so they are awesome. Here are two similar but slightly different ideas:


This one uses ribbon and chair railing (which is optional, for flat, un-topped tree). Check it out here.


And one that uses fabrics and odds and ends as bases here.


Tuesday, November 29, 2011

Christmas Tree Tutorials - Tissue Paper


I've been saving up ome ideas for post-Thanksgiving/beginning of Christmas, so I'm excited to finally post them. I am super into Christmas. It's my favorite time of the year, and I LOVE it. Especially Christmas decorations, which can unfortunately be expensive. Since this is our first year in our own place without roommates, I really wanted to go crazy decorating... but without spending a fortune. So, I turned to the internet in search of crafty Christmas tutorials.

And I sure wasn't disappointed... I found some awesome ideas that I'll be sharing with you over the next few weeks - including a couple of my own tutorials slipped in which my camera man cooperates (are you reading this? You need to take pictures for me!).

This tutorial is great, because it uses the cheapest thing ever - tissue paper! Tissue paper is awesome, because not only is it practically free (seriously, get it at the dollar tree), but it is fluffy and soft and can be used in all sorts of ways. This tutorial planted some tissue-paper tree ideas in my head... I might have to make a few of my own tutorials! Check out Halsey's tutorial on these trees here.

Wednesday, December 15, 2010

12 Days of Christmas ~ Three French Hens

Well, I couldn't think of a good 'hen' project that didn't involve chicken in the form of food, which seems... wrong. So, I decided on something that hens produce - eggs! French eggs, to be precise. I also have an extension on this tutorial that I'll be posting tomorrow, so check back then for something to do with your eggs!


What you need:

- 3 plastic easter eggs, wood, or styrofoam eggs
- Print outs of 3 different types of french writing (I just googled french text and french handwriting and found some jpegs to use, or if you want I can post the ones I have - just leave a comment if you want them!)
- Mod podge
- foam brush

For Tomorrow:
- glass container, like a candy dish, that your eggs will fit in
- ribbon
- florist moss


Step 1: Rip up your french text! Tear the print outs into strips that can be decoupaged onto the eggs.


Step 2: Spread some mod podge on the egg where you want your first strip to go. Put the strip of paper down, and put another layer of mod podge on top! Continue this way, slightly overlapping the different pieces of paper to get a layered look.


Step 3: Do this with each egg until you're finished! Be careful of spreading the mod podge too much; depending on your printer you might have some ink bleeding if you mess with it too much.


And there you have it - three French eggs.

You could put them in a bowl, in a clear container, anywhere you need an extra filler decoration! Any other ideas on what to do with these?

Tuesday, December 14, 2010

12 Days of Christmas ~ Two Turtle Doves


...in the form of napkin rings!


What you need:

Note that you can get the birds and nest in the floral department at most craft stores - I got mine at Michael's. Sometimes you can even get the birds already in the nest!

- A napkin ring
- A small bird nest- small enough so it doesn't look funny on the napkin ring.
- Two any-color birds, preferably with brown wings
- A hot glue gun
- Bleach
- A couple Q-tips


Step 1: Glue your birds into the nest. I did this first; in retrospect it might have been smarter to do step two first!


Step 2: Now, obviously we don't want orange birds for our turtle doves. In fact, until I actually looked it up I thought they should be white! Then I saw this picture:


I was pretty happy, because I wasn't able to find solid white birds at the craft store and the only ones they had had brown wings made out of pinecone pieces, which would be hard to bleach or paint!


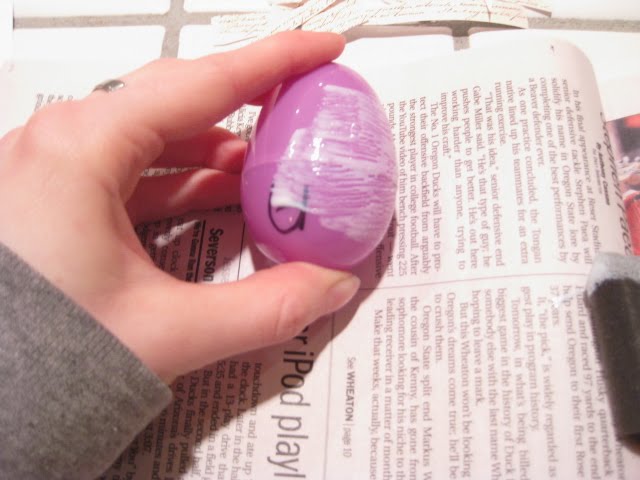
SO, dip your Q-tip into some bleach and dab it along the birds. You should see the color start to fade almost immediately. Keep dabbing and rubbing until all the color has faded (you might need to wait a couple minutes to see the complete results).

This is what they looked like partway through:

Step 4: Grab your napkin rings. I would personally use skinnier, more organic looking ones, but there were all we had in the drawer so I used them.


Now, hot glue the bottom of your bird nest to the napkin ring. Pull your fancy napkins through (once again, I would probably use a more organic cloth for this, but purple damask was all I had on hand!) and voila, two turtle doves and a holiday napkin holder.


Check back tomorrow for 3 French Hens - I'm really excited about this one!

Monday, December 13, 2010

12 Days of Christmas ~ Partridge in a Pear Tree


I thought a partridge in a pear tree seemed like quite a difficult way to start... what could you possible make out of that? But then I found this absolutely gorgeous tutorial and fell in love. I want to make a million of these as Christmas ornaments to give as gifts!


This tutorial was created by For the Love of Laundry, and can be found here. Enjoy!

12 Days of Christmas


I LOVE Christmas. I loved Christmas time growing up, and my family has many traditions and rituals that really define the season to me. It is hands down my favorite time of year - partly because my birthday is December 12th. Because of this, I was a bit confused when I was young between the two holidays. I got presents wrapped in santas and snowmen for both, there was a Christmas tree for both...can you see where the confusion was? Most of all, the 12 Days of Christmas song confused me. December 12th, 12 days of Christmas... is it really a huge stretch that I thought that song was about my birthday?

The picture at the top is a cover of a book I had (and still have!). I used to read it every year; the illustrations were beautiful and it only increased my fascination with the song

Anyway, I really wanted to do something special and Christmas-y this year, so I decided to do a twelve days of Christmas set of postings. I don't know if I"ll be able to do it or not, but each day between now and Christmas I'll try to find or create a tutorial that corresponds with the appropriate number. Wish me luck!!!!


LinkWithin

Related Posts with Thumbnails