Monday, June 21, 2010

Summer of Skirts - Circle Skirt Tutorial

Some announcements first: The Dorothy Dress Giveaway will be ending Sunday (6/27) evening. Check the post for rules to enter- but remember, if you don't leave a comment you aren't entered in the giveaway!


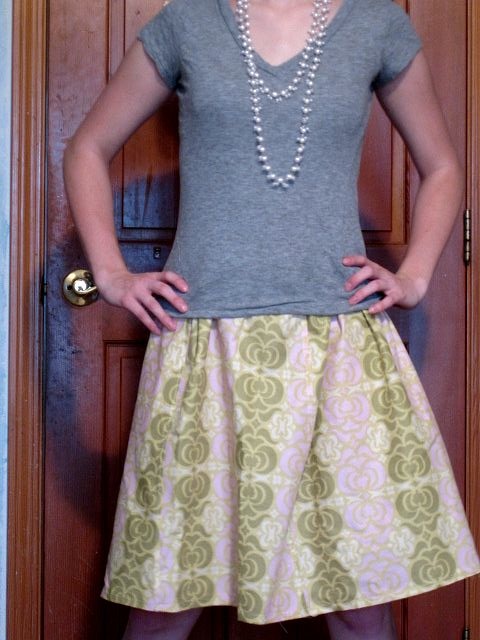
Circle skirts are awesome. They provide that perfect fit that flares at the bottom without creating icky bulk at the waistband. I don't know about you, but when I usually think about circle skirts I think about poodle skirts and vintage, long, 1950's skirts. Like this:


However, you obviously make them whatever length you want (and by the way, can you imagine buying a pattern for anything like this? Talk about a waste of money...)! There are a lot of them out right now in knee length and above for summer, and they are really cute and flirty looking.

Also - I don't know why I never though of this before! But they make AWESOME skirts for dresses! Any pattern you have where the top and bottom of the dress are different pieces, you can substitute a circle skirt for a whole new look. A quick modcloth search yielded the below circle-skirt dresses:


Now on to the tutorial!


Before I even tell you what you need, we need to do a little math. Super easy math, I promise! The steps on this tutorial will be a little out of order, because you need to see how to do it before you can figure out how much fabric you need.

***If any of this doesn't make sense, leave a comment and I'll clarify!! It may look scary, but it's really simple, and any confusion is just becuase I may not have explained it well enough.

There is one decision to make first though: You can either make this with an elastic waist or a waistband with a zipper.

Measuring steps:

Step 1: If you are making a waistband, measure around your waist where you want your skirt to sit. This is the circumference. Subtract 4 from it (to counteract bias stretching). To get the number we want, divide the result by 6.28. This number = w.

If you decide to make an ELASTIC waist, measure the widest part of your hips and add 5 inches to that. Divide the result by 6.28 This measurement = w.

Step 2: Decide how long you want skirt (an exact length, starting where you want your skirt to sit on your waist). This measurement = L.


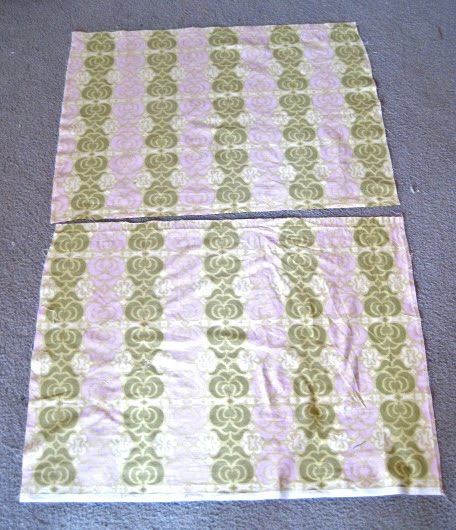
Now here's the key to the whole skirt: how you cut out your fabric. This 'pattern' assumes you have four pieces of fabric you are cutting through. What you want to do is draw the two curving lines shown on your fabric. For the smaller line, make two marks on the fabric at the point shown: the w you got earlier. NOTE: DO NOT USE W/2. That is a mistake in the diagram; simply use your w measurement. For the larger arc, measure out from the smaller line mark and measure L as shown. If one of the L's is on the fold when you're cutting, that's fine! Fewer seams to sew later.

At this point you can figure out how much fabric you need. I'll give an example: Say my w is 36 inches and my L is 30 inches. I would need a total of 4 squares measuring (30+[(36-4)/6.28] = 30+ 5.01 = ) 35 by 35. OR, you could have two rectangles measuring 35 by 70, each folded in half.

So, here's what you need:
- Fabric of the dimensions calculated above
- Bias tape to match your fabric
-Elastic
OR
- waistband materials: extra fabric, interfacing, and a zipper. If you don't know how to make a waistband, hold tight for a few days - my next skirt tutorial has a waistband in it.


Now, simply sew all of the panels together at the sides, so you wind up with this:
**If you are making a waistband, do not sew the last seam all the way up - leave room for the 9" zipper.

Next, sew the bias tape around the outside edge. If you don't want to use bias tape you can just hem it, but I'll warn you that's pretty ambitious if you don't have experience with curved hems (which I HATE). They're kind of nasty sometimes.

Finally, if you are using elastic, sew an elastic casing around the inside circle and insert the elastic (Go here for help). If you are doing a waistband, have at it - or wait until next week for further instruction!


Don't forget the enter the giveaway! I already have the next couple week's skirt tutorial made; I just need to get some good pictures!


Monday, June 14, 2010

Summer of Skirts - Elastic A-Line Tutorial


This skirt is great, because it is almost as easy as the 20 minute skirt but is more flattering and versatile. I plan on making many more of these! It's also worth noting that my current giveaway (enter to win if you haven't already!) dress features this type of skirt.

What you need:
-elastic - enough to fit around your waist; i prefer 3/4 inch for skirts
-1 yard of fabric if you normally wear a small/medium, maybe a little more if you are large and up
- a yardstick or newspaper or something with a long straight edge


Step 1: Cut along the fold of your fabric, so you have two pieces with the cut fold on one end and the selvage on the other. Then put the pieces back together as they were before you cut them, with the wrong sides together.


Step 2: Now you have a little bit of math to do. Measure the width of your fabric and divide it by three. Mark off the 1/3 point on the top of the fabric and the 2/3 point at the bottom. This is important to make sure your skirt fits: Take the 1/3 measurement and multiply it by 4 - that is how many skirt panels you will have. If this measurement is not at least a few inches bigger than your hips, you will need to do closer proportions. That is, mark of the points at 4/10 at the top and 6/10 at the bottom, for example. Keep trying different proportions until you have something that will fit you - the important part is to keep some of the angle in though.

Step 4: Then, put your yardstick/newspaper/whatever at each of these marks, so you have a diagonal across the fabric. Using this as a guide, cut along the diagonal through BOTH pieces of fabric.


Step 5: You should know have four pieces of fabric. Two should look like the picture below, and two should look like the mirror image of those.


Step 6: This part is optional, but it will make hemming a whole lot easier. Fold the straight edge of each panel over to the diagonal edge, making sure the top corners line up. Mark where the straight edge hits the diagonal edge.

Now, trim the panels with a curve so that the diagonal edge is the same length as the straight edge.


Now I got really bad about taking pictures, but the hard part is behind you!

Step 7: Sew the skirt panels together. It is best if you keep straight edges to straight edges and diagonals to diagonals, but if you did step 6 it won't matter too much. I used french seams (tutorial here) to make mine look more professional. Make sure you press your seams!

Step 8: Now hem your skirt and put the elastic casing in (tutorial here).


What I really love about this skirt is it's pretty versatile: you can wear it up on your waist with a cute belt like this:

Or wear it lower on your hips like this:


Now celebrate your new skirt with some bunny kisses!


Coming up next in the summer of skirts tutorials are a men's button-down shirt to skirt tutorial and waistband a-line!

Summer of Skirts - Simple Elastic Skirt tutorial


So, it looks like today is going to be a twofer. I had planned on doing a tutorial of the most basic skirt on the planet. However, after doing some research it looks like many people have beat me to it! I found a tutorial that I really like via Grosgrain (and by the way, if you've never visited this site you are REALLY missing out...she's awesome!). So, I'll put up the elastic A-line tutorial tonight as well!

Not only does she give a great tutorial of how to do this 20 minute (or less!) skirt, but she shows how to do a basic elastic waistband, which is something I always forget to take pictures of. So, this little link will double as an elastic waistband tutorial, I think :)


Check out the amazingness of Grosgrain and her 20 minute skirt here!

Friday, June 11, 2010

Heart Corsage Shirt - Tshirt refashion tutorial!


Who doesn't have a few boring t-shirts laying around? Here's a really easy and fun way to breathe some new life into your basics.

What you need:
- plain fitted t-shirt (this works best on one with a scoop or v-neckline)
- jersey/knit/tshirt scraps in desired colors (ones that will complement the t-shirt. I used 3 different colors)


Here's the t-shirt I started with in white (mine is blue):
Step 1: Cut heart shapes out of the knit scraps. If you don't know how, here's the short cut for cutting a heart (in the middle image, the fold is on the right edge):


I think I used about 20 hearts, but it really depends on how big you want your corsage to be and the size of your t-shirt. Also, I originally didn't cut enough and had to go back to make more, so don't worry too much about the exact number. You can always add or subtract some.


Step 2: Lay the hearts out along the neckline or wherever you want them on the shirt, overlapping and imperfect. You have two choices here: you can pin them to the shirt, which will take a lot of pins but ensure you get the exact design you want, or you can get an idea of what you want and then free hand it (which is what I did). Sorry, no picture of this one. Look at the completed picture for guidance.


Step 4: Staring at the shoulder, stitch the hearts down. Make sure you fold and twist them a little as you go to give them some structure and dimension. Also: I used white thread, and didn't want to sew over the navy and grey hearts I had with the white thread. So, I kept my white hearts mainly on top and placed my colored ones so that sewing on the white hearts would take them down as well.

Step 5: Sewing the hearts down can be a little tiring, so take a break and chat with a friend. The furrier the better.

Step 6: Finish tacking down your hearts. Then, try the shirt on - you'll probably realize that some spots look a little bare or that you didn't go up or down far enough along the neckline. Easy to fix - stick a few more hearts on where needed.


And here you go! The fun thing about this is you can do as much or as little as you want, in whatever color combinations you want.


Here's a better picture of the detail (the only full length one I had obviously didn't turn out so well!)


Don't forget to enter in my giveaway for a cute summer dress - there aren't many entries so far so the odds are looking good!

Also, the first summer of skirts tutorial is coming tomorrow! I also have a few more in progress, so keep checking back.

Thursday, June 10, 2010

Sewing Basics - Hem (no raw edges!) Tutorial


I know this one is pretty obvious, but I went a long time simply folding up the raw edge of what I wanted to hem and then sewing it. This winds up with a lot of fraying and looks icky, so I just wanted to put this tutorial out for the beginners!

Step 1: Iron the raw edge up about 1/4 inch all the way around where you want to hem.

Step 2: Fold the fabric up again, so the raw edge is tucked inside and iron.


Step 3: Stitch along the hem - sorry, I forgot to take a picture of the end. But it's pretty obvious...


That's it, you're done!

Wednesday, June 9, 2010

The "Cabo" Dress - version 2!


I love, love, love this dress! It is super comfortable, and unlike the original Cabo dress it isn't see through at all!

With this dress, I followed the same steps as the original Cabo dress tutorial. Then, I followed Disney from Ruffles and Stuff 's instructions (the link to these is on the cabo tutorial) to make the braided straps and belt. I used t-shirt scraps left over from the original Cabo dress from that.

For the ruffle on the front of the dress, I cut strips from a ribbed tank top (the same one I used for the Dorothy Dress!) I gathered a small amount, and the sewed over the top of the navy ruffle. Make sure you do this before putting the elastic in the top!


The possibilities for this basic t-shirt dress are endless! Post links if you make any!

Also, sorry about the weird pictures... I don't know how but it looks like I screwed them up a little!

Sunday, June 6, 2010

A Summer of Skirts - TUTORIALS!


I love skirts. They're so cute and comfortable and easy, and perfect for summer - especially if you're feeling a little too pale or flabby to wear shorts. I always forget how awesome skirts are... and so, here's my new project. I will be making and posting tutorials of every different type of skirt I can think of - with the exception of all skirts frumpy or requiring ridiculous amounts of fabric.


I'm hoping to do a new one a week for the whole summer, but as we all know life sometimes gets in the way of good intentions... and I'm a little concerned about running out of ideas (although I already have like 6, so that's not bad I guess...). I've already got a basic elastic A-line almost ready to post up for you, and some others lined up behind.


So - who is interested in sewing along with me for a summer of skirts? I need your help here - post ideas of types of skirts, and I'll figure out how to make them!! I'm also thinking of setting up a flickr pool so people can post their creations. What do you think?


Saturday, June 5, 2010

Sewing Basics - French Seam Tutorial

I've been sewing for years, but I never knew how to do a french seam until recently. They're so easy and offer that perfect finishing touch on a project, yet I never took the five minutes to learn how to do them. I bet a lot of people are in the same boat, so I thought it might be a good idea to make some 'sewing basics' tutorials for people who are beginning sewers or who have simply not learned some sewing skills (like me!!). Are there any specific requests??

So, on to French Seams. Don't be scared by the number of steps - they're quite simple and after you do them once you'll remember how to do them forever :)

What you need:
- fabric (whatever your project is)
- an iron!

Step 1: Put the WRONG sides of the fabric together where you want the seam, and stitch. This will seem counter-intuitive, but I promise it will work out in the end :)

Step 2: Trim the seam down as far as you can (further than my picture shows, if possible), and then press the seam open.

This shows the backside of the fabric.

Step 3: Fold the fabric along the seam and press, wrong-side out.

Step 4: Stitched down the length of the seam, with the fold you just pressed at the edge of the foot ( once again, the fabric should be wrong side out).

Step 5: Open the fabric up and iron along the seam, so the 'flap' you created will lay flat.

Step 6: Now, your final seam: stitch the edge of the flap down. Make sure your seams are straight and even, otherwise it will look funny!

You're done! This is what the wrong side of the fabric should look like:

And here's what the right side of the fabric should look like:


No raw edges!!

Wednesday, June 2, 2010

Tank Dress Giveaway!!! - CLOSED

Finally, here it is-my very first giveaway item!! I'm so excited about it and hope you all love it as much as I do (I was so tempted to keep it once I finished)!


I call it the "Dorothy" dress. :)

This tank dress features a white ribbed-knit top and a gingham skirt, attached with wide white elastic. It has a gingham bow attached to one shoulder and white pleats decorating the front of the top. The skirt is french-seamed, so there are no exposed raw edges in it.

It should fit a small to a medium. I am modeling it in these pictures, and the elastic sits around my waist without stretching. It fits me very comfortably, though it might be a bit to large on anyone smaller than me. The tank top part of the dress is sized a medium, if that helps.

The measurement of the elastic unstretched is 27 inches, and FULLY stretched (note, this would not be very comfortable to wear!) is 44 inches. My waist measures 25 inches, so I believe it will fit a waist of 24 - 40 inches. HOWEVER, this is simply my estimate - it depends on your comfort level.


Here is a close up of the bow on the shoulder - I realized that the full-length pictures didn't show it off very well. Also, a close up of the pleats before they are stretched.


Rules for Entering:

There are 3 easy things you need to do to enter the giveaway:

1) Become a follower of my blog
2) Create a post linking to it on your own blog.
3) Leave a comment with your email address and the link to the post on your blog that has the link to my link (ha ha, does that make sense??)

This counts as one entry. You can get one extra entry by adding a picture of the dress to your link!

If you have any questions or difficulty with any of this, send me an email or leave a comment and I'll get back to you within the day.


The duration of this giveaway is somewhat flexible. I'm thinking a week or possibly even two, but you can enter as long as the post heading says ACTIVE instead of CLOSED.

Good luck!!


LinkWithin

Related Posts with Thumbnails