


This skirt is great, because it is almost as easy as the 20 minute skirt but is more flattering and versatile. I plan on making many more of these! It's also worth noting that my current giveaway (enter to win if you haven't already!) dress features this type of skirt.
What you need:
-elastic - enough to fit around your waist; i prefer 3/4 inch for skirts
-1 yard of fabric if you normally wear a small/medium, maybe a little more if you are large and up
- a yardstick or newspaper or something with a long straight edge
Step 1: Cut along the fold of your fabric, so you have two pieces with the cut fold on one end and the selvage on the other. Then put the pieces back together as they were before you cut them, with the wrong sides together.
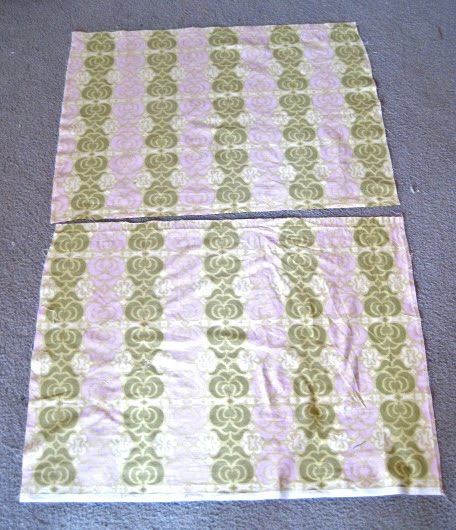 Step 2: Now you have a little bit of math to do. Measure the width of your fabric and divide it by three. Mark off the 1/3 point on the top of the fabric and the 2/3 point at the bottom. This is important to make sure your skirt fits: Take the 1/3 measurement and multiply it by 4 - that is how many skirt panels you will have. If this measurement is not at least a few inches bigger than your hips, you will need to do closer proportions. That is, mark of the points at 4/10 at the top and 6/10 at the bottom, for example. Keep trying different proportions until you have something that will fit you - the important part is to keep some of the angle in though.
Step 4: Then, put your yardstick/newspaper/whatever at each of these marks, so you have a diagonal across the fabric. Using this as a guide, cut along the diagonal through BOTH pieces of fabric.

Step 5: You should know have four pieces of fabric. Two should look like the picture below, and two should look like the mirror image of those.

Step 6: This part is optional, but it will make hemming a whole lot easier. Fold the straight edge of each panel over to the diagonal edge, making sure the top corners line up. Mark where the straight edge hits the diagonal edge.

Now, trim the panels with a curve so that the diagonal edge is the same length as the straight edge.

Now I got really bad about taking pictures, but the hard part is behind you!
Step 7: Sew the skirt panels together. It is best if you keep straight edges to straight edges and diagonals to diagonals, but if you did step 6 it won't matter too much. I used french seams (tutorial here) to make mine look more professional. Make sure you press your seams!
Step 8: Now hem your skirt and put the elastic casing in (tutorial here).
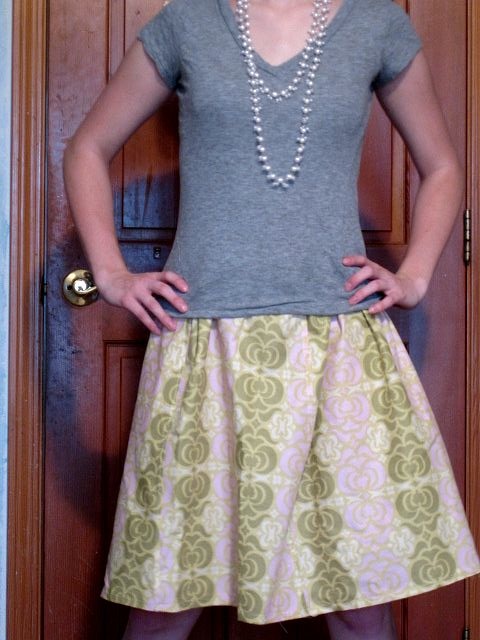
What I really love about this skirt is it's pretty versatile: you can wear it up on your waist with a cute belt like this:

Or wear it lower on your hips like this:
Now celebrate your new skirt with some bunny kisses!
Coming up next in the summer of skirts tutorials are a men's button-down shirt to skirt tutorial and waistband a-line!
Hi! Can't wait to make this skirt but you lost me at Step 2...LOL!
ReplyDeleteI'm a size 14 so I estimated 1 1/4 yd or 45". So I divide this by 3? which is 15". and I get the whole make a line from the 1/3 point to the 2/3 point.
What I don't get is the part of your directions:
"This is important to make sure your skirt fits: Take the 1/3 measurement and multiply it by 4 - that is how many skirt panels you will have."
Could you clarify, please? So do you mean multiply the 15" x 4? do you mean I'll have 4 panels? Do i get the 4 panels because I laid 2 pieces over the top and then cut it at an angle...so that gives me 4 pieces...
sorry to run on and on...
thanks for your help!
I am with you 'anonymous". I am completely baffled by Step 2 (and the missing Step 3). The skirt is so cute... can you please help? thanks
ReplyDeletei am also confused.. why are we cutting diagonal anyway? and what do we do with the other half of the fabric that we cut off? is that the other panels just upside down? i would like to make this skirt and the one with the bow in the back. help!!!
ReplyDeleteHi guys, I just made this skirt for my daughters so I thought I would reword it. "Take the 1/3 measurement and multiply it by 4 - that is how many skirt panels you will have. If this measurement is not at least a few inches bigger than your hips, you will need to do closer proportions.
ReplyDeleteExample= If at the 1/3 mark it measures say 10" then you would multiply this by 4 which would equal 40". If your hips are larger than 40" then you would start the top of the diagonal mark further over. So you would have to mark it more so that the top of the panel is 11" which would give you 4" more to work with (1" x 4 panels). Does this make sense?
2.Also it is cut in a diagonal so that it is not a strait skirt but a more flowy skirt.
3.NO the other panel is not upside down when you trim the bottom edge all 4 pieces will then match.
Hope this doesn't just cause more confusion! Margie
From Margie again,
ReplyDeleteI was wrong about the other panel. It is an upside down version. I didn't catch it as the material I used for my girls was the same whether is was upside down or not. So. YES, the smaller part of each piece becomes the waist.
Forgot to add that if you move your measurement over to make it larger, you have to do the same at the bottom of the material since the smaller measurements become the waist. SORRY IF I MADE IT MORE CONFUSING!!!! Margie
thanks margie! that did clarify it!
ReplyDeleteCan you tell me where you got your belt???
ReplyDeletethis skirt is really cute, but the directions are wayyyy confusing. what's the difference between this and doing just a basic hunk of fabric and gathering it? i've been sewing for 20 years, and these directions totally mystify me. step two needs lots of work.
ReplyDeleteSo if there is 4 panels, or in the bow tie skirt's case, 6 panels, doesnt this mean there would be a seam down the front of the skirt. It doesnt look like hers has one in the front?? and wouldnt you now want to have to see the seam in the front of it....am i missing something? help pleasee!!!
ReplyDeleteOh I'm so glad I'm not alone! I thought it was pregnancy brain! I guess I just need to get in there and actually try it. Maybe it will become clear as I work on it?
ReplyDeleteI think what she is trying to do with the "triangles" is to give the skirt a bit of shape. If you look at an A-Line skirt it looks alot like what she is trying to achieve. The difference between what she is doing and sewing a rectangle and then gathering it is that you end up with a lot of bulk at the waist which stretches out to nothing at the hips, which makes it look funny.
ReplyDeleteI'm confused on where it says cut diagonally then you should have four pieces. I only have two.
ReplyDeleteThank you for posting the cute skirt (and all the anonymous tips to help clarify!). So cute and I LOVE your belt! I plan to make one this weekend and highlighted your skirt on my blog today. :)
ReplyDeleteTracey
http://ciaofromtexas.blogspot.com/2012/09/5-fun-skirt-tutorials.html
Oh my gosh, we have the same "velveteen" rabbit! Mine is a crazy kisser like yours! I've had big bunnies before but these mini's are too sweet. Great skirt -- whipping it up to wear to the KY Derby in 2 days. Wish me luck!
ReplyDeleteThis is additionally a decent post which I truly appreciated perusing. It is not consistently that I have the likelihood to see something like this.
ReplyDeletebape hoodie
ReplyDeletebape hoodie outlet
yeezy
golden goose outlet
golden goose
off white outlet
off white clothing
curry shoes
supreme
kyrie 9
crrtvs3672hk
ReplyDeletegolden goose outlet
golden goose outlet
golden goose outlet
golden goose outlet
golden goose outlet
golden goose outlet
golden goose outlet
golden goose outlet
supreme outlet
golden goose outlet