Showing posts with label skirts. Show all posts

Tuesday, December 21, 2010

12 Days of Christmas ~ Eight Maids a Milking


...in these adorable milkmaid aprons!! These beautiful aprons can be worn two ways; a standard apron and a more 'milk maidish' version. To make, see here.


Thursday, October 21, 2010

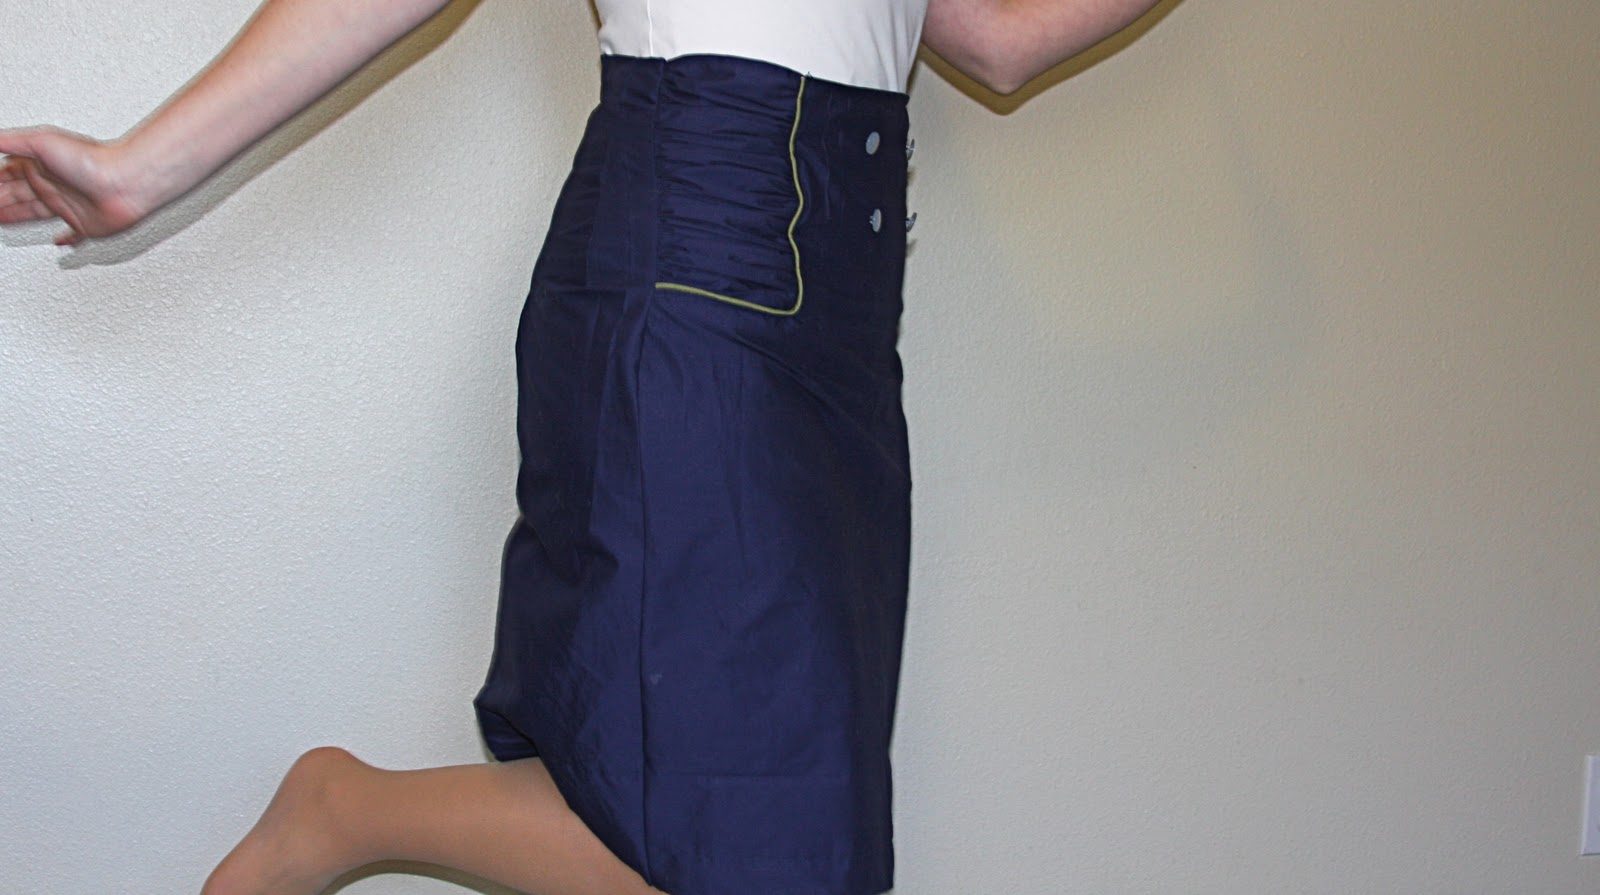
Military Pencil Skirt - guest tutorial!

Here is our second guest post! I asked Shauna if she could do a guest post for me after seeing some of her other projects - she and her sister do amazing stuff over at their blog! Check it out here! I am sooo in love with this tutorial - this skirt just got bumped to the top of my to do list.


Hi Ruffle and Roses readers! I was so honored to be invited to guest post here!


My name is Shauna and I am one of the Shwins behind Shwin & Shwin. My sister and I started the blog to share our ideas with each other and with anyone else who was interested and it has been a ton of fun. Today I am going to share an inspired by the runway look.


A few weeks back I made a skirt for my daughter inspired by this look from project runway. It was from the team challenge, from team millitary lace.


This is the skirt I made for my daughter tutorial found HERE


Today we are going to make a few adjustments and make one for a grown up.


So let's get started!


You will need:


  • Fabric

  • Piping

  • Buttons

  • Zipper


The pattern for this skirt is really easy. Here are the basic shapes. All straight lines so I cut it free hand. Then length of all the pieces is the same and that is the desired length you want the skirt (plus enough for hemming and finishing the top edge so add an inch or two) To get the width Measure around the widest part of your lower half for me it is around my hips and behind. Divide that in half this is the width of the front piece, then cut a back piece the same width plus 1 inch and cut that in half the long way so you have two rectangles (pictured on the right in the picture) With your front piece fold it in half and cut away the space for the side panels. How big you make them is up to you. I measured from where I would wear the skirt on my waist down just past my hip bone and that was how low I cut, as for width, I did about 5 inches. Again it's up to you and how you want it to look in the end. Then with the width of what you cut away (so for me 5 inches) cut two rectangles that width and the length of the skirt. Then you are done. Easy right?


On to sewing. First sew under the top edge. (you can do this now to all of your pieces, it will save you time later)


Then you are going to take your piping and pin it along the edge of your cut out. (on the right side of the fabric) Pin it piping facing in, and when you get to the corner as shown above you can put two little slits in the edge of the piping to help you round the corner. Once you pin it sew it in place following the stitching line that is already on the piping.


Then turn the piping so the flap is in the wrong side of the fabric and your piping should neatly outline the cutouts and top stitch in place.


This is what you should end up with. Do it for both sides of the cut out.


Then take your long narrow rectangle and with the basting stitch sew along both long sides of the piece.


Then pin your ruffled piece in side the cut out.


On the back now. First sew the zipper in place. (follow the instructions on the zipper you buy)


Then sew the two back pieces together below the zipper.


I thought I got a picture of this next step but I didn't sorry. Next you are just going to sew the right sides together along the side seams, sewing together the front and back pieces.


If you tried your skirt on at this point then you probably noticed it is a box that is a gapping mess all around your waist. If for some reason it it not and it fits your perfect then skip this next part. So to pleat the top of the skirt so that it fits your body this is what I do. Measure around your waist where you will wear the skirt. Subtract that measurement from the measurement of the skirt. This will tell you how many inches you have to take out of the skirt. Starting in the middle back I place one pleat on each side of the zipper, and then another pleat and so forth until your measurement becomes your waist measurement. To make these pleats, fold the fabric over so right sides are together and place a pin how narrow or wide you make the pleats depends on how much you are taking in. Then measure from your waist down to where your widest point is, this tells you how long your pleats should be. I pin the whole pleat and then Try the skirt on inside out o see if it is a good fit.


Then sew your pleats. The bottom of your pleat needs to taper off real gradually so your done have a weird pucker on the outside so make it a gradual slope (like pictured above)


When you are done pleating, you re done with your skirt. After this I added a few buttons to the front, but that is optional, do what you like.


Try it on


Jump around


And Enjoy!

Tuesday, August 31, 2010

Salsa Skirt - Summer of Skirts


Sorry for my absence; I just moved back to Oregon and was very busy packing and wrapping things up! There is (probably) only 1 more summer of skirts post after this one, as summer is sadly coming to an end.

This skirt is quite similar to the blue ruffle skirt as far as construction goes, but it is simpler and has a very different look to it! I thought it looked like a mix between a pencil skirt and a flamenco skirt, and then I realized it reminded me of a salsa dancing skirt! Hence the name :)

What you need:
- About a yard of knit fabric, depending on your size (see step 1 for details).


I made this skirt have a half lining to it because the knit was so thin. So, I had extra fabric along the inside.

Step 1: Measure around the widest part of your hips. Add 2 to that measurement. This is w. Also, measure how long you want the skirt to be, and how long you want the extra lining material to be - usually just enough to cover your rear is good- and add it to itself. This is L. Next, cut out three strips measuring 2 inches by w.


I'm sorry I didn't get pictures of this part. If you have questions let me know!

Step 2: Mark where your length measurement of the skirt ends (so you should have a mark between the extra lining fabric you added and the actual length you want your skirt to be). Fold the fabric at that point, so you wind up with a fold at the waistband, the normal skirt on one side, and the lining part on the other. Do this on both pieces of fabric, and then pin them together so the lining part is on the OUTSIDE.


Step 3: You might want to curve the top of the skirt, depending on where you want your skirt to sit. I wanted mine to sit on my waist, so I curved it along the hips a bit - with the lining still pinned and the skirt folded (because you'll want the lining curved as well). If you need help with this, go here. Now, simply sew the sides together on your two pieces of fabric, and you'll wind up with your main skirt piece. Now turn the skirt right side out, and you're onto the ruffles!

Step 4: Gather each of the three ruffles. Pin the first one to the bottom of the skirt, so the edge lines up with the bottom of the skirt. Sew it on!


Step 5: Repeat with each of the other ruffles, laying each on top of the previous one so that the seam is covered. I just had my top ruffle's raw edge exposed, but if you don't like that you can do the following:

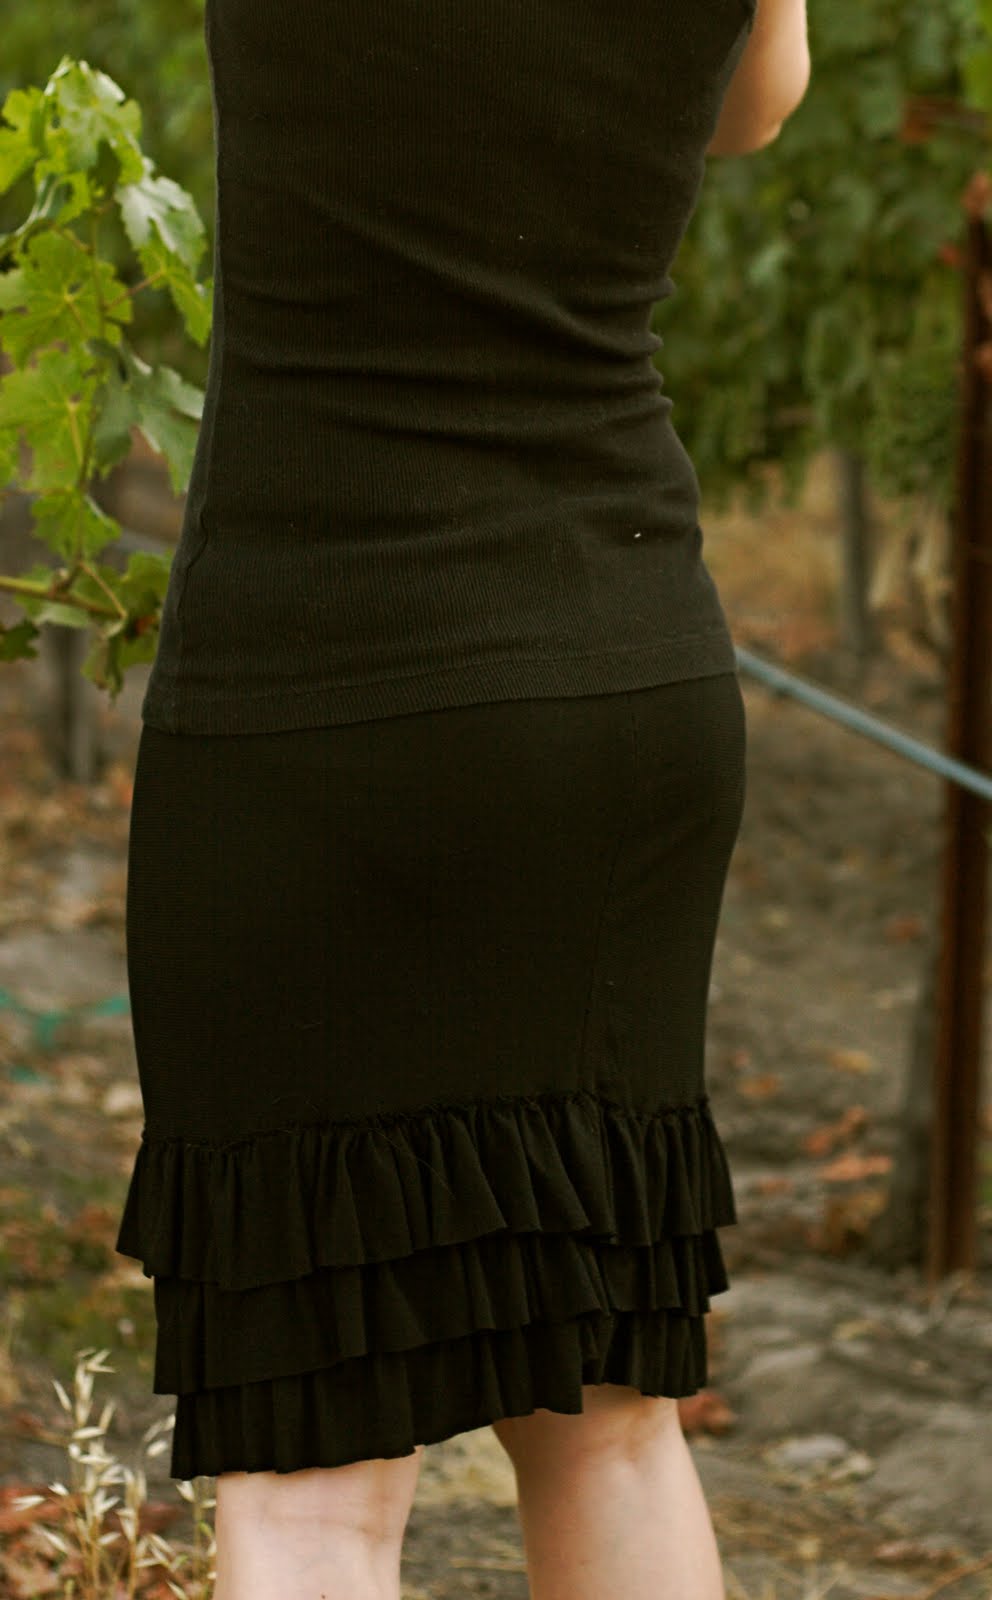
Sew the top ruffle on about an inch above the second one, put facing the opposite direction. Then, press it down flat over the other ruffles, the way it's supposed to be. This will hide the seam. You may need to do a topstich over the ruffle though, as it may poof out a bit.


Ta da!! Time for salsa dance lessons!
]

Saturday, August 21, 2010

Summer of Skirts - Pinwheel Skirt Tutorial


How adorable is this skirt? I think it's my favorite skirt tutorial I've featured yet! Leanne from Elle Apparel put together this tutorial for a guest post on Ucreate - learn how to make it here!

Saturday, August 7, 2010

Summer of Skirts - The Cupcake Skirt


This skirt didn't turn out quite as planned. I didn't intend for it to be so... cupcake-y. And I guess by that I mean poofy. Part of the reason why the top is so puffy is because I used muslin for the whole thing. If you want to avoid that, get some cotton gauze for the top part or an equivalent fabric. Anyway, here it is - the cupcake skirt!


What you need:

- bleached muslin: I used a yard and half, but it depends on your size.
- unbleached muslin: 1/2 yard
- enough elastic to fit around your waist

Sorry about the horrible pictures; my camera died so I used my roommate's and obviously had no idea what I was doing.

Step 1: Cut out the main skirt piece. For this you'll want to follow the basic skirt tutorial, but you'll want the skirt to be less full and puffy. Also, it helps to contour the skirt a little so it's more a-line (so, make it a little narrower on top). This will keep it from being to puffy on the top around your hips.


Step 2: Now, measure the bottom of your main skirt piece (just one of the pieces). Multiply that by two, and then again by 1.5. Cut out 2 ruffles each from the unbleached muslin and the bleached muslin measuring the above by 2 inches.

Set aside the remainder of your bleached muslin - you will use this for the upper ruffle part of the skirt later.

Step 3: Sew the sides of the main skirt part together. Gather each of the strips you cut out to the width of the skirt, and pin a bleached ruffle on to the bottom of the skirt -about an inch away from the edge of the skirt. Now, sew the ruffle to the skirt.


Step 4: Repeat with each of the ruffles, alternating bleached and unbleached. Make sure you sew each ruffle on low enough so that it covers the seam of the previous ruffle.

Once all 4 ruffles are on, your skirt should look like this:


Step 6: Now for the upper ruffle. Measure the length between the top of the last ruffle you've sewn and the top of your skirt, and add half an inch. Cut out a piece of bleached muslin that measure that by 1.25 times the width of the skirt. You don't want much more than that; otherwise your skirt will be super puffy like mine was. Once again, you might want to cut a bit of an a-line to this piece to help with the puffiness. Sew the sides together and gather the top - it should look like it's own little skirt now.


Step 7: Finally, sew the top ruffle to the skirt! Make sure you pin it well first and check to make sure that it covers the top ruffle seam before you sew it.


Step 8: Sew the skirt onto the elastic. If you haven't done this before, basically you stretch the elastic as you sew it to the fabric. You need to pin it all together first though, so you know how much to stretch each section of elastic.

Ta da, you're done! I wore mine with a belt, because I thought it looked kind of funny otherwise. If anyone has any variations on this skirt that turned out a little better I'd love to see them!


Monday, August 2, 2010

Summer of Skirts - Anthropologie Ruffled Skirt Tutorial


Here it finally is - the anthropologie inspired skirt tutorial! There are two ways to do this. One is to make the whole skirt yourself using a knit fabric, and the other is to take an existing pencil or slim a-line skirt you already have and add the ruffles to it. If you choose to do the latter, simply skip to the ruffle steps below.

What you need:
- About a yard of knit fabric, depending on your size (see step 1 for details). This will be the main fabric - mine was grey.
- Two contrasting fabrics, about 1/4 to 1/8 each.


I made this skirt have a half lining to it because the knit was so thin. So, I had extra fabric along the inside.

Step 1: Measure around the widest part of your hips. Add 2 to that measurement. This is w. Also, measure how long you want the skirt to be, and how long you want the extra lining material to be - usually just enough to cover your rear is good- and add it to itself. This is L. Next, cut out two strips of skirt measuring L by w.


I'm sorry I didn't get pictures of this part. If you have questions let me know!

Step 2: Mark where your length measurement of the skirt ends (so you should have a mark between the extra lining fabric you added and the actual length you want your skirt to be). Fold the fabric at that point, so you wind up with a fold at the waistband, the normal skirt on one side, and the lining part on the other. Do this on both pieces of fabric, and then pin them together so the lining part is on the OUTSIDE.


Step 3: You might want to curve the top of the skirt, depending on where you want your skirt to sit. I wanted mine to sit on my waist, so I curved it along the hips a bit - with the lining still pinned and the skirt folded (because you'll want the lining curved as well). If you need help with this, go here. Now, simply sew the sides together on your two pieces of fabric, and you'll wind up with your main skirt piece. Now turn the skirt right side out, and you're onto the ruffles!

Step 4: Cut contrasting fabric number 1 into strips that are 1.5 times as long as the skirt is around (you may need to sew multiple strips together). Gather this strip, pin, and sew along the bottom of the skirt along the right side. Don't worry, the raw edges will be hidden by the next ruffle.

Step 5: Cut a strip of contrasting fabric #2 so that it is the same length as the skirt width (all around). Gather it, then pin it starting about 1/3 of the way away from the side seam. Pin it all around the skirt, stopping about the same distance from the seam on the back side. Sew it in place.
Step 7: Now cut a strip 1.5 times the skirt (I'm just going to call the measurement around the skirt 'the skirt' now... ) of the original skirt material. Pin it onto the skirt, slanting it up over the contrast ruffle you just did, like shown in the picture below. You want to make sure it still covers all of the seams of the lower ruffle but slopes up subtly. Sew it on!
Step 7: Next is another partway ruffle! Ruffle a strip of contrast #1 that is about the same length as 'the skirt', and sew it on starting a little closer to the side seam than the white ruffle was. Once again, slope it up so it follows the line of the previous ruffle.

Step 8: Here is your final ruffle! Get another strip of the original skirt fabric that is 1.5 times the 'skirt length' and ruffle and sew it around. However, this time you will pin it facing UP, as shown in the horrible blurry picture below. Make sure you pin it quite close to the previous ruffle, as it will fold over (to hide the seam) and lose some of it's height.


Now, just flip the top ruffle down and iron. Ta da!


LinkWithin

Related Posts with Thumbnails