Saturday, December 18, 2010

12 Days of Christmas ~ Five and Six!

I got behind yesterday, so today will be a two-fer!


...so no one's wine glasses get mixed up!!

A set of these make great gifts! They're super easy to make, very customizable, and beautiful. If you are super creative, you can even combine them with the next tutorial as well...

Find out how to make these here.


This was a super tough one. Just like hens, what can you really do with geese? Ah... eggs! More specifically, golden eggs. So I guess it should really be 'On the sixth day of Christmas my true love gave to me, six geese a laying golden eggs.."


I made one of these necklaces for my mom for mother's day with birthstones of her kids in it. However, I think the idea of simply gold eggs is also beautiful. I'm not super fond of the nest in the above picture, but the tutorial I found for you (I was going to make one, but thought that maybe there'd be one out there - turns out there are tons!) makes beautiful, more realistic nests, like below:


These would also make amazing gifts - find out how to make them here.


12 Days of Christmas ~ Four Colly Birds


I knew right away what project I'd have to post for this one!! For any crafter who hasn't made some of these bird softies, try them out! They're super easy, fun, cute, and make great gifts. There is a link to the pattern for them here.

Wednesday, December 15, 2010

12 Days of Christmas ~ Three French Hens

Well, I couldn't think of a good 'hen' project that didn't involve chicken in the form of food, which seems... wrong. So, I decided on something that hens produce - eggs! French eggs, to be precise. I also have an extension on this tutorial that I'll be posting tomorrow, so check back then for something to do with your eggs!


What you need:

- 3 plastic easter eggs, wood, or styrofoam eggs
- Print outs of 3 different types of french writing (I just googled french text and french handwriting and found some jpegs to use, or if you want I can post the ones I have - just leave a comment if you want them!)
- Mod podge
- foam brush

For Tomorrow:
- glass container, like a candy dish, that your eggs will fit in
- ribbon
- florist moss


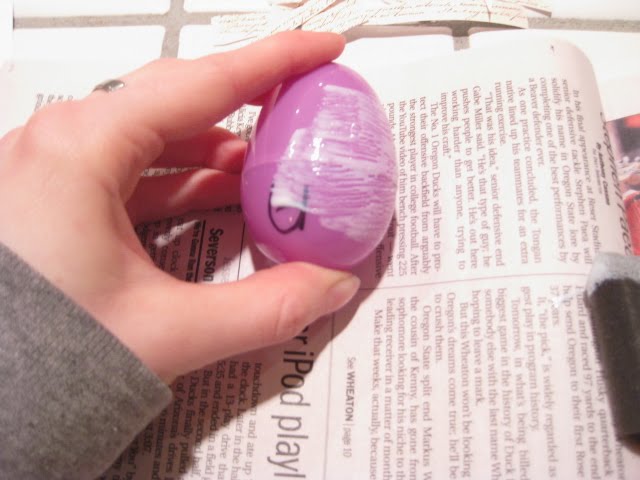
Step 1: Rip up your french text! Tear the print outs into strips that can be decoupaged onto the eggs.


Step 2: Spread some mod podge on the egg where you want your first strip to go. Put the strip of paper down, and put another layer of mod podge on top! Continue this way, slightly overlapping the different pieces of paper to get a layered look.


Step 3: Do this with each egg until you're finished! Be careful of spreading the mod podge too much; depending on your printer you might have some ink bleeding if you mess with it too much.


And there you have it - three French eggs.

You could put them in a bowl, in a clear container, anywhere you need an extra filler decoration! Any other ideas on what to do with these?

Tuesday, December 14, 2010

12 Days of Christmas ~ Two Turtle Doves


...in the form of napkin rings!


What you need:

Note that you can get the birds and nest in the floral department at most craft stores - I got mine at Michael's. Sometimes you can even get the birds already in the nest!

- A napkin ring
- A small bird nest- small enough so it doesn't look funny on the napkin ring.
- Two any-color birds, preferably with brown wings
- A hot glue gun
- Bleach
- A couple Q-tips


Step 1: Glue your birds into the nest. I did this first; in retrospect it might have been smarter to do step two first!


Step 2: Now, obviously we don't want orange birds for our turtle doves. In fact, until I actually looked it up I thought they should be white! Then I saw this picture:


I was pretty happy, because I wasn't able to find solid white birds at the craft store and the only ones they had had brown wings made out of pinecone pieces, which would be hard to bleach or paint!


SO, dip your Q-tip into some bleach and dab it along the birds. You should see the color start to fade almost immediately. Keep dabbing and rubbing until all the color has faded (you might need to wait a couple minutes to see the complete results).

This is what they looked like partway through:

Step 4: Grab your napkin rings. I would personally use skinnier, more organic looking ones, but there were all we had in the drawer so I used them.


Now, hot glue the bottom of your bird nest to the napkin ring. Pull your fancy napkins through (once again, I would probably use a more organic cloth for this, but purple damask was all I had on hand!) and voila, two turtle doves and a holiday napkin holder.


Check back tomorrow for 3 French Hens - I'm really excited about this one!

Bundt Pan Specs

I realized after posting last night that I should've given some more info on the cake pan I'll be using for my recipe reviews and giveaway, so here it is!


Part of the reason why I chose this particular pan was because it was inexpensive. I hate it when I see bloggers review things that they have gotten for themselves or for a giveaway that is out of a normal person's price range. Really, who'se going to go buy that after seeing the review? And then you get so excited about something, only to go to the website and find that to get that item you'd have to sell your house/car/kids. So, I wanted to pick something that was reasonable.

How reasonable you ask? $14.99. Not bad, eh?

Here's the rest of the info on this pan:

Nordicware Natural Commercial 2 Piece Angelfood Cake Pan


Made of even heating, rust proof aluminum and galvanized steel wire around the rims for added strength, bakers agree that aluminum is best. A removable bottom for easy cake removal.

Features:

  • Constructed of aluminum
  • Cooling feet
  • Lifetime warranty
  • 9.4" x 9.4" x 4.25"

Tell me what you think - do you like this idea? How would you use this pan?

Have Holiday Baking to Do?


I know it's been a while; school has been eating my time and soul. I am on break for the holidays now though, and have a few projects planned!

A while ago I mentioned that I was approach to do a giveaway for the CSN stores. I decided to get 2 bundt cake pans, as I've been wanting to do more baking for the holidays. That means one for me to test and review, and one to give away to one of you!

I've been collecting a set of recipes (I'm thinking 3 to 5) that I will try making, baking, and reviewing, and then after all of the reviews are in I'll do the giveaway.

ALSO, here's the most important part. If you have an amazing recipe for a bundt cake that you love, send it to me at the email listed under my about me section with the subject 'bundt recipe' and I'll feature you on my blog!

Here's the pan I'll be giving away:


Monday, December 13, 2010

12 Days of Christmas ~ Partridge in a Pear Tree


I thought a partridge in a pear tree seemed like quite a difficult way to start... what could you possible make out of that? But then I found this absolutely gorgeous tutorial and fell in love. I want to make a million of these as Christmas ornaments to give as gifts!


This tutorial was created by For the Love of Laundry, and can be found here. Enjoy!

12 Days of Christmas


I LOVE Christmas. I loved Christmas time growing up, and my family has many traditions and rituals that really define the season to me. It is hands down my favorite time of year - partly because my birthday is December 12th. Because of this, I was a bit confused when I was young between the two holidays. I got presents wrapped in santas and snowmen for both, there was a Christmas tree for both...can you see where the confusion was? Most of all, the 12 Days of Christmas song confused me. December 12th, 12 days of Christmas... is it really a huge stretch that I thought that song was about my birthday?

The picture at the top is a cover of a book I had (and still have!). I used to read it every year; the illustrations were beautiful and it only increased my fascination with the song

Anyway, I really wanted to do something special and Christmas-y this year, so I decided to do a twelve days of Christmas set of postings. I don't know if I"ll be able to do it or not, but each day between now and Christmas I'll try to find or create a tutorial that corresponds with the appropriate number. Wish me luck!!!!


Wednesday, November 10, 2010

Beaded Pin Epaulet Tutorial - Guest Post!

I LOVE this awesome tutorial made especially for us by Sew Petite Gal. This adorable tutorial is just a peek at the awesomeness that she creates! Check out her blog for some stylish tutorials!


I just want to first say how honored and thrilled I am to be guest-posting on Ruffles and Roses! This tutorial will show you how to create your own beaded pin for use as an epaulet or pin for cardigans, tees, blazers, headbands, etc.

First, here’s a look at my inspiration: ROCKSTAR Sushi Striped Embellished Epaulet Tee, Neiman Marcus, $121:


I love this shirt! It combines my favorite elements of nautical stripes, beading and shoulder/sleeve detail. I had a similar striped tee from Old Navy already and so I set off to make my epaulets since I really didn’t want to spend the money to buy the tee if I could make a similar version. I didn’t want to worry about the beads falling off in the washer so I decided to make it a pin instead of sewing it directly to the tee.

Materials:

Felt

Sheer Fabric

Invisible Nylon Thread and needle

Paper

Pin

Misc. beads – I used pearls, tubes, crystal-esque and silver beads


First, you’ll want to create some kind of template on scrap paper. I made kind of bulbous Saturn-esque shape that is approximately 5” wide by 3.5”. Using this template, cut this shape out from your sheer material. I used the solid border of the above fabric. Using your fingers, gently fray the edges.

Then you’ll want to cut out a smaller shape in felt. I decided to go with a leaf type shape since that was how I envisioned the bead distribution.


Center and place the felt piece behind your sheer fabric. Start sewing your beads on. (You can technically also glue your beads down but I was afraid that it would make it too stiff to lay flush against my shoulder.) I alternated different sizes and bead types. This is the tedious part but it’s worth it at the end! J

Once you’ve achieved the look / distribution of beads you’re going for, go ahead and secure the pin backing to the felt with a few stitches.


Voila! You’re finished. This pin is ready for your t-shirt/cardigan/blazer/headband/etc!


Here’s how I wear mine:


Friday, November 5, 2010

Help me!!!

I need more of your bright ideas for some guest tutorials!! If you've sent me one and haven't heard from me, send it again - I get a little unorganized with my inbox :)


Also, as soon as I pull out my camera I'll share an adorable little present sent to me by one of you!

LinkWithin

Related Posts with Thumbnails