


Here it is - finally! A swingy red skirt just in time for the 4th of July. Sorry it took so long to get this tutorial up - moving and internet problems delayed me. As always, if you have any questions at all or if I didn't explain things well enough, leave a comment and I should get back to you within the day. Or, send me an email!
Oh, yeah, and I almost forgot - I'll be giving this skirt away to celebrate my 100 followers. Yay!
What you need:
- The measurement of around your waist where you want the skirt to sit. We'll call this number w.
- 1 1/2 yards of fabric (less if you want a less poofy skirt)
- 9 inch zipper in the same color as your fabric
- A piece of interfacing measuring 2" by w
 Step 1: Cut your fabric.
First, for the waistband and tie: Decide how long you want your ties to be (I made mine the same as my waist measurement for simplicity). Then, multiply that number by two - one for each tie- and add it to w. The result is your waistband length, l. You need one strip of your fabric measuring l wide by 3 inches tall. Cut these out (you'll probably need to sew multiple strips together to make this work). MAKE SURE that when you cut these out you cut along the SHORT end of the fabric- the one that measures either 45 or 60 inches, not the selvage edge. Otherwise, you are cutting away your skirt's length.
For the skirt, we're going to be using the same pieces that we did for the elastic A-Line skirt, so cut your main skirt panels out following steps 1-6. I wanted my skirt a little puffier, so I actually cut another diagonal (hence buying 1 1/2 yards instead of 1 yard) and wound up with 6 panels instead of 4. You can pretty much just use how every much fabric is left over from the ties and get a skirt similar to mine. Sew each of the panels together, so you wind up with one big skirt panel (leave the two ends apart though!).
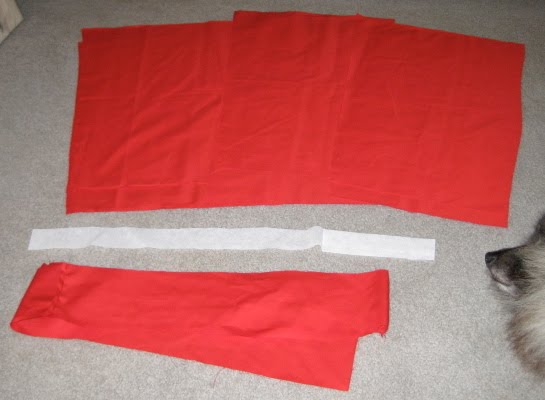
Here are the pieces (including the interfacing, not including the sleeping dog) you should have:
Step 2: If you had to sew your strips to get ones of the correct length, make sure you press your seams flat. Then, fold your strip in half lengthwise, with the WRONG sides facing out. It's hard to tell in the pictures, but that's what you want. Iron the strip like this.

Step 3: Next, open the folded strip, wrong side facing you. Find the middle of the tie and the middle of the interfacing, then line them up. Line up the edge of the interfacing with the edge of the strip and the fold. Iron the interfacing down.
 Step 4: Refold the strip, so that the wrong edges are on the outside. Now, starting at one end of the strip, sew the edges together until you get to the interfacing. Stop there, and repeat on the other side. You should have the waistband with the interfacing ironed in in the middle of the strip, and then two ties sew shut on either side. Turn the strip right side out.
Step 5: Now that the ties are right side out, fold the waistband edges up INSIDE the waistband along the seam. Do this one at a time - it is easier! Here's a picture of it done partway:

And all the way:

Step 6: Here's the part I didn't document - putting the zipper in! Zippers can be complicated and intimidating, but if you follow the instructions that come with the zipper you should be able to put it in with no problem! After you put the zipper in, leave it unzipped for this next step.
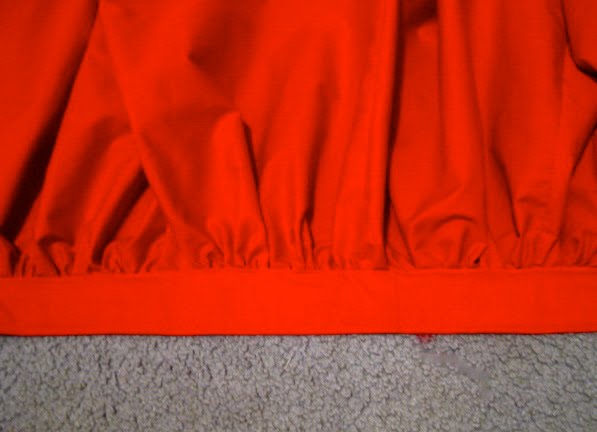
Step 7: Gather the skirt, and pin each end to the place inside the waistband where the interfacing ends. Note that the waistband should be like a little 'pocket', with one side open. The gathered skirt will be pinned INSIDE this little 'pocket', so no raw edges will be showing.

Step 8: Fold the ends of the ties in so the raw edges don't show, then press. Stitch all around the ties, stopping once again at the waistband.

Step 9: Sew the skirt into the waistband where you've pinned. You'll want to make sure you're sewing low enough so that your stitches catch the fold on the waistband (so the waistband raw edges are firmly stitched under). Since you won't be able to see both sides of the waistband as you sew, be careful you don't run off one of the edges!
 Now you're all done! You should have a zippered skirt with a waistband that merges right into the tie. Zip it up, tie a pretty bow, and you're ready to go!


Lovely. I really love red skirts, beautiful!
ReplyDeleteI love it!
ReplyDeleteAwesome skirt. The bow makes it so pretty!
ReplyDeletethis is really pretty, great job and beautiful photos!!!
ReplyDeleteSweet!!
ReplyDeleteHi, I just found your blog through craft gossip, I love this idea. I never wear shorts so I am either in a skirt or dress. I have been wanting to make a tier skirt with a thick elastic top. I love this one
ReplyDeleteamy
Cute! Can't wait for the give away! I'll be making this in red this weekend!!
ReplyDeleteyou have an award from arts crafts n hobbies
ReplyDeleteLOVE this skirt.. it's cherry red (you little bomb, you!) and so classy. I would love to make this, and I would hope it comes out looking as beautiful as this. Great pics for the tutorial, you are so generous! And a sweet little doggy nose included :D I'm bookmarking this!!
ReplyDeleteI JUST made the same skirt, but without the bow, a few days ago!
ReplyDeleteBeautiful skirt. I love the color and the bow on the back.
ReplyDeleteCatabohorquez (at) hotmail (dot) com
Just found this site and it's so amazing! Thanks for the great tutorials!
ReplyDeleteCan you elaborate further how to have a zip at the back, and a bow? I'm confused about how the waistband is sewn into the zipper, then can also be a bow... Maybe if you could show a pic it'd be easier to understand?
ReplyDeleteThanks!
I am a new fan of this blog and I adore this skirt( and all the skirts you have made!!)The bow makes it PERFECT. I really want to get more into sewing and this is perfect motivation. Thanks!!
ReplyDelete-Kayla
thisfarfromhome.blogspot.com
Can you explain how you made 6 panels instead of 4? Did the 2 extra panels have one straight and one angled side? Thank you!
ReplyDeleteFound you on pinterest! your blog is cute and I love this tutorial. I've wanted a bow tie waist skirt and this will help :)
ReplyDeletecute skirt! i'm studying to be an engineer too :) (not software though, i'm interested in structural/mechanical. yay for craftsy engineers!)
ReplyDeleteI love this skirt! It looks so great on you. What fabric did you use?
ReplyDeleteI made a trial version myself (shorter because my legs are short and look even shorter when I wear such a long skirt) and the fabric doesn't seem to fall als nice as yours.
Wow, i came across your blog in google images. I was searching for sewing patterns. This skirt is lovely!
ReplyDeleteSorry, where exactly should I sew in the zipper? Do I sew it into the sides of open skirt panels? I've gotten all the way to Step 6, and now I'm stranded!
ReplyDeletePlease help!
I'm dying to make this skirt, but the directions are dreadfully confusing....How did you manage to get 6 panels using the same method as the other skirt?
ReplyDeletebeautiful! love it! I'm going to make it for my daughters and myself!!
ReplyDeletethanks for lovely giveaway
ReplyDeleteSo very pretty!!
ReplyDeleteThanks for the cute skirt! I live in the desert and it's cooler to wear skirts. I'm going to add a pocket on one side in the seam.
ReplyDeleteHi! I was wondering how you're going about giving the skirt away, if you haven't already. I LOVE your site!
ReplyDeletePerfect!
ReplyDeletecan't wait to try this!
ReplyDeleteYour skirt and combine is gorgeous :-)
ReplyDeletePleas visit me: renngarek.blogspot.com.tr
supreme clothing
ReplyDeletepalm angels tracksuit
jordan shoes
supreme hoodie
golden goose
off white clothing
kevin durant shoes
yeezy shoes
golden goose
nike off white
jhewvw34276
ReplyDeletegolden goose outlet
golden goose outlet
golden goose outlet
golden goose outlet
golden goose outlet
golden goose outlet
golden goose outlet
golden goose outlet
golden goose outlet
golden goose outlet