Showing posts with label skirts. Show all posts

Saturday, July 17, 2010

Summer of Skirts - Men's Dress Shirt Refashion Tutorial


I've been noticing that there are a lot of skirts right now that look like they were made from button down shirts, and it gave me an idea. I had a skirt from my grandpa that was a really nice light cotton, and I thought it'd be perfect for a skirt! Here's some of the pictures that inspired me - and might give you some ideas!


I decided to keep my buttons in the back though - although the skirt could pretty much go either way! There was a placket that went over the buttons on this shirt, so the buttons wouldn't be exposed anyway. This tutorial is going to be really simple, because it is pretty much the same thing as the red bow skirt.

What you need:

- A men's dress shirt (or a woman's - it depends on how big or how long you want your skirt to be)
-Interfacing for the waistband

Step one: Cut the collar and sleeves off of the shirt. Decide how long you want your skirt to be, and trim the shirt down from the top (so you can keep the hem on the bottom of the shirt). Trim the sides so they smoothly go up to the top in one line.


Step Two: Follow steps here to complete the rest of the skirt, but omit the zipper.

There are three options for this skirt: Have the tie and buttons in the back, like I did, have the tie and buttons in front, or have the buttons in front and the tie in back. If you do this last option, you'll need to add a zipper - the buttons are what allow you to put the skirt on and off without a zipper!


So go hit the thrift store and find some awesome men's shirts, and if you make one I'd love it if you send me the picture or link! If I get pictures I'll post them with a link back to you :)

Also - my camera died and I lost the charger, so I'm borrowing my roommates camera which I obviously don't know how to use... I don't know why my background is in focus and I'm not! So sorry about the blown out pictures.


Sunday, July 11, 2010

Summer of Skirts - Pencil Skirt


Since I'm cheating this time, I thought I'd cheat twice so we can have something for the grown ups too. I was going to do a pencil skirt tutorial, but then I saw this amazing one through sewing.craftgossip.com. By the way, if you've never been there, you're missing out big time.

Anyway, here's the awesome tutorial on drafting a pencil skirt pattern!

Summer of Skirts - Ruffled Skirt Tutorial for little girls!


I'm cheating this week. I won't be posting my own tutorial this week, but will instead be featuring someone else's. I'm doing this for 3 reasons: 1. My skirt for this week flopped (bummer...), 2. I have no kids and therefore no projects for them, but I know that those of you with kids are probably interested in making something for your little girls, and 3. This skirt is adorable. Seriously, it makes me want to procreate immediately.


Also, give me feedback - do you guys want to see more child - sized stuff? Because I have seen a ton of really, really adorable tutorials for little girls lately that I would be more than happy to share with you! Just say the word and they're yours :)

Tuesday, July 6, 2010

The Red Bow Skirt Giveaway!!! - CLOSED


Who'se ready for another giveaway? I must admit, when I first completed this skirt I wasn't so very fond of it. It's grown on me though; I love it for it's bright cherry redness, it's cuteness, and oh my - it's comfort. Most skirts that you wear on your waistline seem uncomfortable to me- too tight in an area that wants no tightness. This skirt is great because it has the wonderful tie - it makes all the difference!


We took pictures of this skirt the morning after a friend of mine's wedding. It was held in the most beautiful location; I knew we had to go back to that area for some pictures. It was my first time being a bridesmaid, and it was such a beautiful wedding with a sunset reception!


I'd like to make a little shout out to my wonderful photographer. You can definitely tell when I take the pictures and he does. Frankly, I suck and he's pretty much awesome. Unfortunately, for the rest of the summer you're stuck with me and my photography. Long distance...sigh....
Anyway, to my photographer: Thank you, and I love you.


Now, for the rules. Read carefully!

You can enter 1, 2, or 3 times.

For 1 entry: Leave a comment and follow my blog!

For 2 entries: Leave a comment, follow the blog, and link back from your blog!

For 3 entries: Do all of the above, and make a guess as to where I'm living this summer! Here's your hint:


Sunday, July 4, 2010

Summer of Skirts - Waistband Bow Skirt tutorial


Here it is - finally! A swingy red skirt just in time for the 4th of July. Sorry it took so long to get this tutorial up - moving and internet problems delayed me. As always, if you have any questions at all or if I didn't explain things well enough, leave a comment and I should get back to you within the day. Or, send me an email!

Oh, yeah, and I almost forgot - I'll be giving this skirt away to celebrate my 100 followers. Yay!

What you need:
- The measurement of around your waist where you want the skirt to sit. We'll call this number w.
- 1 1/2 yards of fabric (less if you want a less poofy skirt)
- 9 inch zipper in the same color as your fabric
- A piece of interfacing measuring 2" by w


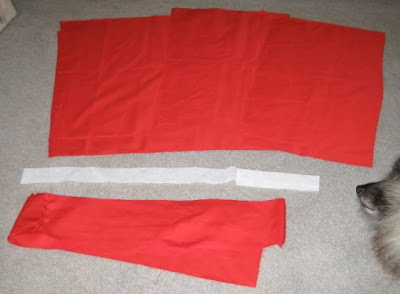
Step 1: Cut your fabric.
First, for the waistband and tie: Decide how long you want your ties to be (I made mine the same as my waist measurement for simplicity). Then, multiply that number by two - one for each tie- and add it to w. The result is your waistband length, l. You need one strip of your fabric measuring l wide by 3 inches tall. Cut these out (you'll probably need to sew multiple strips together to make this work). MAKE SURE that when you cut these out you cut along the SHORT end of the fabric- the one that measures either 45 or 60 inches, not the selvage edge. Otherwise, you are cutting away your skirt's length.

For the skirt, we're going to be using the same pieces that we did for the 
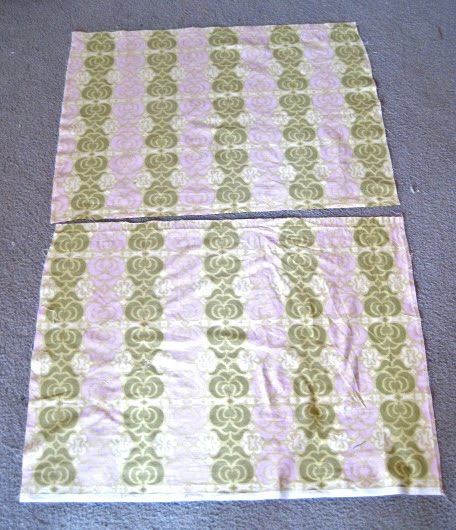
elastic A-Line skirt, so cut your main skirt panels out following steps 1-6. I wanted my skirt a little puffier, so I actually cut another diagonal (hence buying 1 1/2 yards instead of 1 yard) and wound up with 6 panels instead of 4. You can pretty much just use how every much fabric is left over from the ties and get a skirt similar to mine. Sew each of the panels together, so you wind up with one big skirt panel (leave the two ends apart though!).

Here are the pieces (including the interfacing, not including the sleeping dog) you should have:


Step 2: If you had to sew your strips to get ones of the correct length, make sure you press your seams flat. Then, fold your strip in half lengthwise, with the WRONG sides facing out. It's hard to tell in the pictures, but that's what you want. Iron the strip like this.


Step 3: Next, open the folded strip, wrong side facing you. Find the middle of the tie and the middle of the interfacing, then line them up. Line up the edge of the interfacing with the edge of the strip and the fold. Iron the interfacing down.

Step 4: Refold the strip, so that the wrong edges are on the outside. Now, starting at one end of the strip, sew the edges together until you get to the interfacing. Stop there, and repeat on the other side. You should have the waistband with the interfacing ironed in in the middle of the strip, and then two ties sew shut on either side. Turn the strip right side out.


Step 5: Now that the ties are right side out, fold the waistband edges up INSIDE the waistband along the seam. Do this one at a time - it is easier! Here's a picture of it done partway:


And all the way:


Step 6: Here's the part I didn't document - putting the zipper in! Zippers can be complicated and intimidating, but if you follow the instructions that come with the zipper you should be able to put it in with no problem! After you put the zipper in, leave it unzipped for this next step.


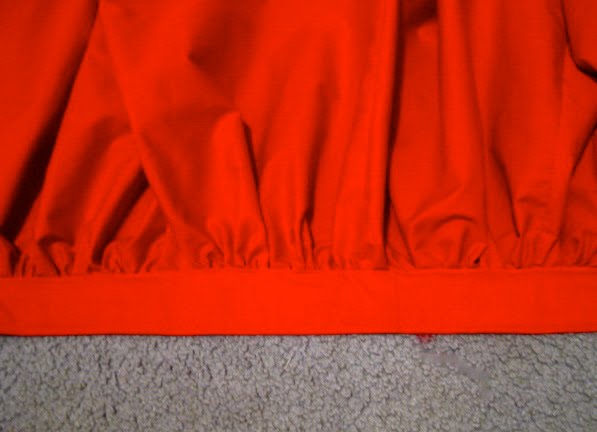
Step 7: Gather the skirt, and pin each end to the place inside the waistband where the interfacing ends. Note that the waistband should be like a little 'pocket', with one side open. The gathered skirt will be pinned INSIDE this little 'pocket', so no raw edges will be showing.


Step 8: Fold the ends of the ties in so the raw edges don't show, then press. Stitch all around the ties, stopping once again at the waistband.

Step 9: Sew the skirt into the waistband where you've pinned. You'll want to make sure you're sewing low enough so that your stitches catch the fold on the waistband (so the waistband raw edges are firmly stitched under). Since you won't be able to see both sides of the waistband as you sew, be careful you don't run off one of the edges!

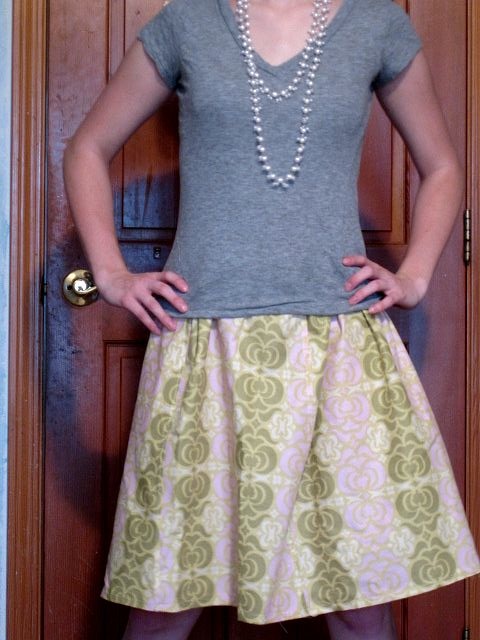
Now you're all done! You should have a zippered skirt with a waistband that merges right into the tie. Zip it up, tie a pretty bow, and you're ready to go!


Monday, June 21, 2010

Summer of Skirts - Circle Skirt Tutorial

Some announcements first: The Dorothy Dress Giveaway will be ending Sunday (6/27) evening. Check the post for rules to enter- but remember, if you don't leave a comment you aren't entered in the giveaway!


Circle skirts are awesome. They provide that perfect fit that flares at the bottom without creating icky bulk at the waistband. I don't know about you, but when I usually think about circle skirts I think about poodle skirts and vintage, long, 1950's skirts. Like this:


However, you obviously make them whatever length you want (and by the way, can you imagine buying a pattern for anything like this? Talk about a waste of money...)! There are a lot of them out right now in knee length and above for summer, and they are really cute and flirty looking.

Also - I don't know why I never though of this before! But they make AWESOME skirts for dresses! Any pattern you have where the top and bottom of the dress are different pieces, you can substitute a circle skirt for a whole new look. A quick modcloth search yielded the below circle-skirt dresses:


Now on to the tutorial!


Before I even tell you what you need, we need to do a little math. Super easy math, I promise! The steps on this tutorial will be a little out of order, because you need to see how to do it before you can figure out how much fabric you need.

***If any of this doesn't make sense, leave a comment and I'll clarify!! It may look scary, but it's really simple, and any confusion is just becuase I may not have explained it well enough.

There is one decision to make first though: You can either make this with an elastic waist or a waistband with a zipper.

Measuring steps:

Step 1: If you are making a waistband, measure around your waist where you want your skirt to sit. This is the circumference. Subtract 4 from it (to counteract bias stretching). To get the number we want, divide the result by 6.28. This number = w.

If you decide to make an ELASTIC waist, measure the widest part of your hips and add 5 inches to that. Divide the result by 6.28 This measurement = w.

Step 2: Decide how long you want skirt (an exact length, starting where you want your skirt to sit on your waist). This measurement = L.


Now here's the key to the whole skirt: how you cut out your fabric. This 'pattern' assumes you have four pieces of fabric you are cutting through. What you want to do is draw the two curving lines shown on your fabric. For the smaller line, make two marks on the fabric at the point shown: the w you got earlier. NOTE: DO NOT USE W/2. That is a mistake in the diagram; simply use your w measurement. For the larger arc, measure out from the smaller line mark and measure L as shown. If one of the L's is on the fold when you're cutting, that's fine! Fewer seams to sew later.

At this point you can figure out how much fabric you need. I'll give an example: Say my w is 36 inches and my L is 30 inches. I would need a total of 4 squares measuring (30+[(36-4)/6.28] = 30+ 5.01 = ) 35 by 35. OR, you could have two rectangles measuring 35 by 70, each folded in half.

So, here's what you need:
- Fabric of the dimensions calculated above
- Bias tape to match your fabric
-Elastic
OR
- waistband materials: extra fabric, interfacing, and a zipper. If you don't know how to make a waistband, hold tight for a few days - my next skirt tutorial has a waistband in it.


Now, simply sew all of the panels together at the sides, so you wind up with this:
**If you are making a waistband, do not sew the last seam all the way up - leave room for the 9" zipper.

Next, sew the bias tape around the outside edge. If you don't want to use bias tape you can just hem it, but I'll warn you that's pretty ambitious if you don't have experience with curved hems (which I HATE). They're kind of nasty sometimes.

Finally, if you are using elastic, sew an elastic casing around the inside circle and insert the elastic (Go here for help). If you are doing a waistband, have at it - or wait until next week for further instruction!


Don't forget the enter the giveaway! I already have the next couple week's skirt tutorial made; I just need to get some good pictures!


Monday, June 14, 2010

Summer of Skirts - Elastic A-Line Tutorial


This skirt is great, because it is almost as easy as the 20 minute skirt but is more flattering and versatile. I plan on making many more of these! It's also worth noting that my current giveaway (enter to win if you haven't already!) dress features this type of skirt.

What you need:
-elastic - enough to fit around your waist; i prefer 3/4 inch for skirts
-1 yard of fabric if you normally wear a small/medium, maybe a little more if you are large and up
- a yardstick or newspaper or something with a long straight edge


Step 1: Cut along the fold of your fabric, so you have two pieces with the cut fold on one end and the selvage on the other. Then put the pieces back together as they were before you cut them, with the wrong sides together.


Step 2: Now you have a little bit of math to do. Measure the width of your fabric and divide it by three. Mark off the 1/3 point on the top of the fabric and the 2/3 point at the bottom. This is important to make sure your skirt fits: Take the 1/3 measurement and multiply it by 4 - that is how many skirt panels you will have. If this measurement is not at least a few inches bigger than your hips, you will need to do closer proportions. That is, mark of the points at 4/10 at the top and 6/10 at the bottom, for example. Keep trying different proportions until you have something that will fit you - the important part is to keep some of the angle in though.

Step 4: Then, put your yardstick/newspaper/whatever at each of these marks, so you have a diagonal across the fabric. Using this as a guide, cut along the diagonal through BOTH pieces of fabric.


Step 5: You should know have four pieces of fabric. Two should look like the picture below, and two should look like the mirror image of those.


Step 6: This part is optional, but it will make hemming a whole lot easier. Fold the straight edge of each panel over to the diagonal edge, making sure the top corners line up. Mark where the straight edge hits the diagonal edge.

Now, trim the panels with a curve so that the diagonal edge is the same length as the straight edge.


Now I got really bad about taking pictures, but the hard part is behind you!

Step 7: Sew the skirt panels together. It is best if you keep straight edges to straight edges and diagonals to diagonals, but if you did step 6 it won't matter too much. I used french seams (tutorial here) to make mine look more professional. Make sure you press your seams!

Step 8: Now hem your skirt and put the elastic casing in (tutorial here).


What I really love about this skirt is it's pretty versatile: you can wear it up on your waist with a cute belt like this:

Or wear it lower on your hips like this:


Now celebrate your new skirt with some bunny kisses!


Coming up next in the summer of skirts tutorials are a men's button-down shirt to skirt tutorial and waistband a-line!

Summer of Skirts - Simple Elastic Skirt tutorial


So, it looks like today is going to be a twofer. I had planned on doing a tutorial of the most basic skirt on the planet. However, after doing some research it looks like many people have beat me to it! I found a tutorial that I really like via Grosgrain (and by the way, if you've never visited this site you are REALLY missing out...she's awesome!). So, I'll put up the elastic A-line tutorial tonight as well!

Not only does she give a great tutorial of how to do this 20 minute (or less!) skirt, but she shows how to do a basic elastic waistband, which is something I always forget to take pictures of. So, this little link will double as an elastic waistband tutorial, I think :)


Check out the amazingness of Grosgrain and her 20 minute skirt here!

Sunday, June 6, 2010

A Summer of Skirts - TUTORIALS!


I love skirts. They're so cute and comfortable and easy, and perfect for summer - especially if you're feeling a little too pale or flabby to wear shorts. I always forget how awesome skirts are... and so, here's my new project. I will be making and posting tutorials of every different type of skirt I can think of - with the exception of all skirts frumpy or requiring ridiculous amounts of fabric.


I'm hoping to do a new one a week for the whole summer, but as we all know life sometimes gets in the way of good intentions... and I'm a little concerned about running out of ideas (although I already have like 6, so that's not bad I guess...). I've already got a basic elastic A-line almost ready to post up for you, and some others lined up behind.


So - who is interested in sewing along with me for a summer of skirts? I need your help here - post ideas of types of skirts, and I'll figure out how to make them!! I'm also thinking of setting up a flickr pool so people can post their creations. What do you think?


LinkWithin

Related Posts with Thumbnails